Java로 스트리밍 에이전트 구축하기
이 퀵스타트 가이드는 기본 에이전트를 생성하고 Java로 ADK Streaming을 활용하여 짧은 지연 시간(Low-latency)의 양방향 음성 상호작용을 구현하는 과정을 안내합니다.
먼저 Java 및 Maven 환경을 설정하고, 프로젝트 구조를 잡은 뒤, 필요한 의존성을 정의합니다. 그 후 간단한 ScienceTeacherAgent를 만들고, Dev UI를 사용하여 텍스트 기반 스트리밍 기능을 테스트한 다음, 라이브 오디오 통신을 활성화하여 에이전트를 대화형 음성 구동 애플리케이션으로 발전시켜 보겠습니다.
첫 번째 에이전트 만들기
기본 요건
-
이 시작 가이드에서는 Java로 프로그래밍합니다. 컴퓨터에 Java가 설치되어 있는지 확인하세요. Java 17 이상을 사용하는 것이 좋으며, java -version을 입력하여 확인할 수 있습니다.
-
Java용 Maven 빌드 도구도 사용하게 됩니다. 진행하기 전에 컴퓨터에 Maven이 설치되어 있는지 확인하세요(Cloud Top이나 Cloud Shell에는 기본 설치되어 있지만, 개인 노트북에는 설치가 필요할 수 있습니다).
프로젝트 구조 준비
ADK Java를 시작하기 위해 다음 디렉토리 구조를 가진 Maven 프로젝트를 생성해 보겠습니다.
설치(Installation) 페이지의 지침에 따라 pom.xml을 추가하여 ADK 패키지를 사용할 수 있도록 설정하세요.
Note
프로젝트의 루트 디렉토리 이름은 원하는 대로 정해도 됩니다 (꼭 adk-agents일 필요는 없습니다).
컴파일 실행
Maven이 이 빌드를 문제없이 처리하는지 확인하기 위해 컴파일(mvn compile 명령어)을 실행해 보겠습니다.
$ mvn compile
[INFO] Scanning for projects...
[INFO]
[INFO] --------------------< adk-agents:adk-agents >--------------------
[INFO] Building adk-agents 1.0-SNAPSHOT
[INFO]   from pom.xml
[INFO] --------------------------------[ jar ]---------------------------------
[INFO]
[INFO] --- resources:3.3.1:resources (default-resources) @ adk-demo ---
[INFO] skip non existing resourceDirectory /home/user/adk-demo/src/main/resources
[INFO]
[INFO] --- compiler:3.13.0:compile (default-compile) @ adk-demo ---
[INFO] Nothing to compile - all classes are up to date.
[INFO] ------------------------------------------------------------------------
[INFO] BUILD SUCCESS
[INFO] ------------------------------------------------------------------------
[INFO] Total time:  1.347 s
[INFO] Finished at: 2025-05-06T15:38:08Z
[INFO] ------------------------------------------------------------------------
프로젝트가 컴파일을 위한 설정이 제대로 된 것 같습니다!
에이전트 생성
src/main/java/agents/ 디렉토리 아래에 다음 내용으로 ScienceTeacherAgent.java 파일을 생성합니다.
package samples.liveaudio;

import com.google.adk.agents.BaseAgent;
import com.google.adk.agents.LlmAgent;

/** 과학 선생님 에이전트. */
public class ScienceTeacherAgent {

  // Dev UI가 에이전트를 동적으로 로드하기 위해 기대하는 필드
  // (에이전트는 선언 시점에 초기화되어야 합니다)
  public static final BaseAgent ROOT_AGENT = initAgent();

  // Live API를 지원하는 최신 모델 ID를 아래 문서에서 확인해 입력하세요.
  // https://google.github.io/adk-docs/get-started/streaming/quickstart-streaming/#supported-models
  public static BaseAgent initAgent() {
    return LlmAgent.builder()
        .name("science-app")
        .description("Science teacher agent")
        .model("...") // Live API용 최신 모델 ID를 입력하세요.
        .instruction("""
            You are a helpful science teacher that explains
            science concepts to kids and teenagers.
            """)
        .build();
  }
}
나중에 이 에이전트를 실행하기 위해 Dev UI를 사용할 것입니다. 도구가 에이전트를 자동으로 인식하려면 해당 Java 클래스가 다음 두 가지 규칙을 준수해야 합니다.
- 에이전트는 BaseAgent 타입의 ROOT_AGENT라는 전역 public static 변수에 저장되어야 하며, 선언 시점에 초기화되어야 합니다.
- 동적 컴파일 클래스로더에 의해 클래스 초기화 중에 로드될 수 있도록, 에이전트 정의는 static 메서드여야 합니다.
Dev UI로 에이전트 실행하기
Dev UI는 에이전트용 UI 애플리케이션을 직접 빌드하지 않고도 개발 목적으로 에이전트를 빠르게 실행하고 테스트할 수 있는 웹 서버입니다.
환경 변수 정의
서버를 실행하려면 두 가지 환경 변수를 내보내야(export) 합니다.
- AI Studio에서 발급받을 수 있는 Gemini 키
- 이번에는 Vertex AI를 사용하지 않음을 명시하는 변수
Dev UI 실행
터미널에서 다음 명령어를 실행하여 Dev UI를 시작합니다.
mvn exec:java \
    -Dexec.mainClass="com.google.adk.web.AdkWebServer" \
    -Dexec.args="--adk.agents.source-dir=." \
    -Dexec.classpathScope="compile"
1단계: 브라우저에서 제공된 URL(일반적으로 http://localhost:8080 또는 http://127.0.0.1:8080)을 엽니다.
2단계: UI의 왼쪽 상단 모서리에 있는 드롭다운에서 에이전트를 선택할 수 있습니다. "science-app"을 선택하세요.
문제 해결(Troubleshooting)
드롭다운 메뉴에 "science-app"이 보이지 않는다면, mvn 명령어를 maven 프로젝트의 루트 디렉토리에서 실행하고 있는지 확인하세요.
주의: ADK Web은 개발용으로만 사용하세요
ADK Web은 프로덕션 배포에서 사용하도록 설계되지 않았습니다. ADK Web은 개발 및 디버깅 용도로만 사용하세요.
음성 및 비디오로 Dev UI 체험하기
브라우저를 사용하여 다음 주소로 이동합니다: http://127.0.0.1:8080/
다음과 같은 인터페이스가 표시될 것입니다.
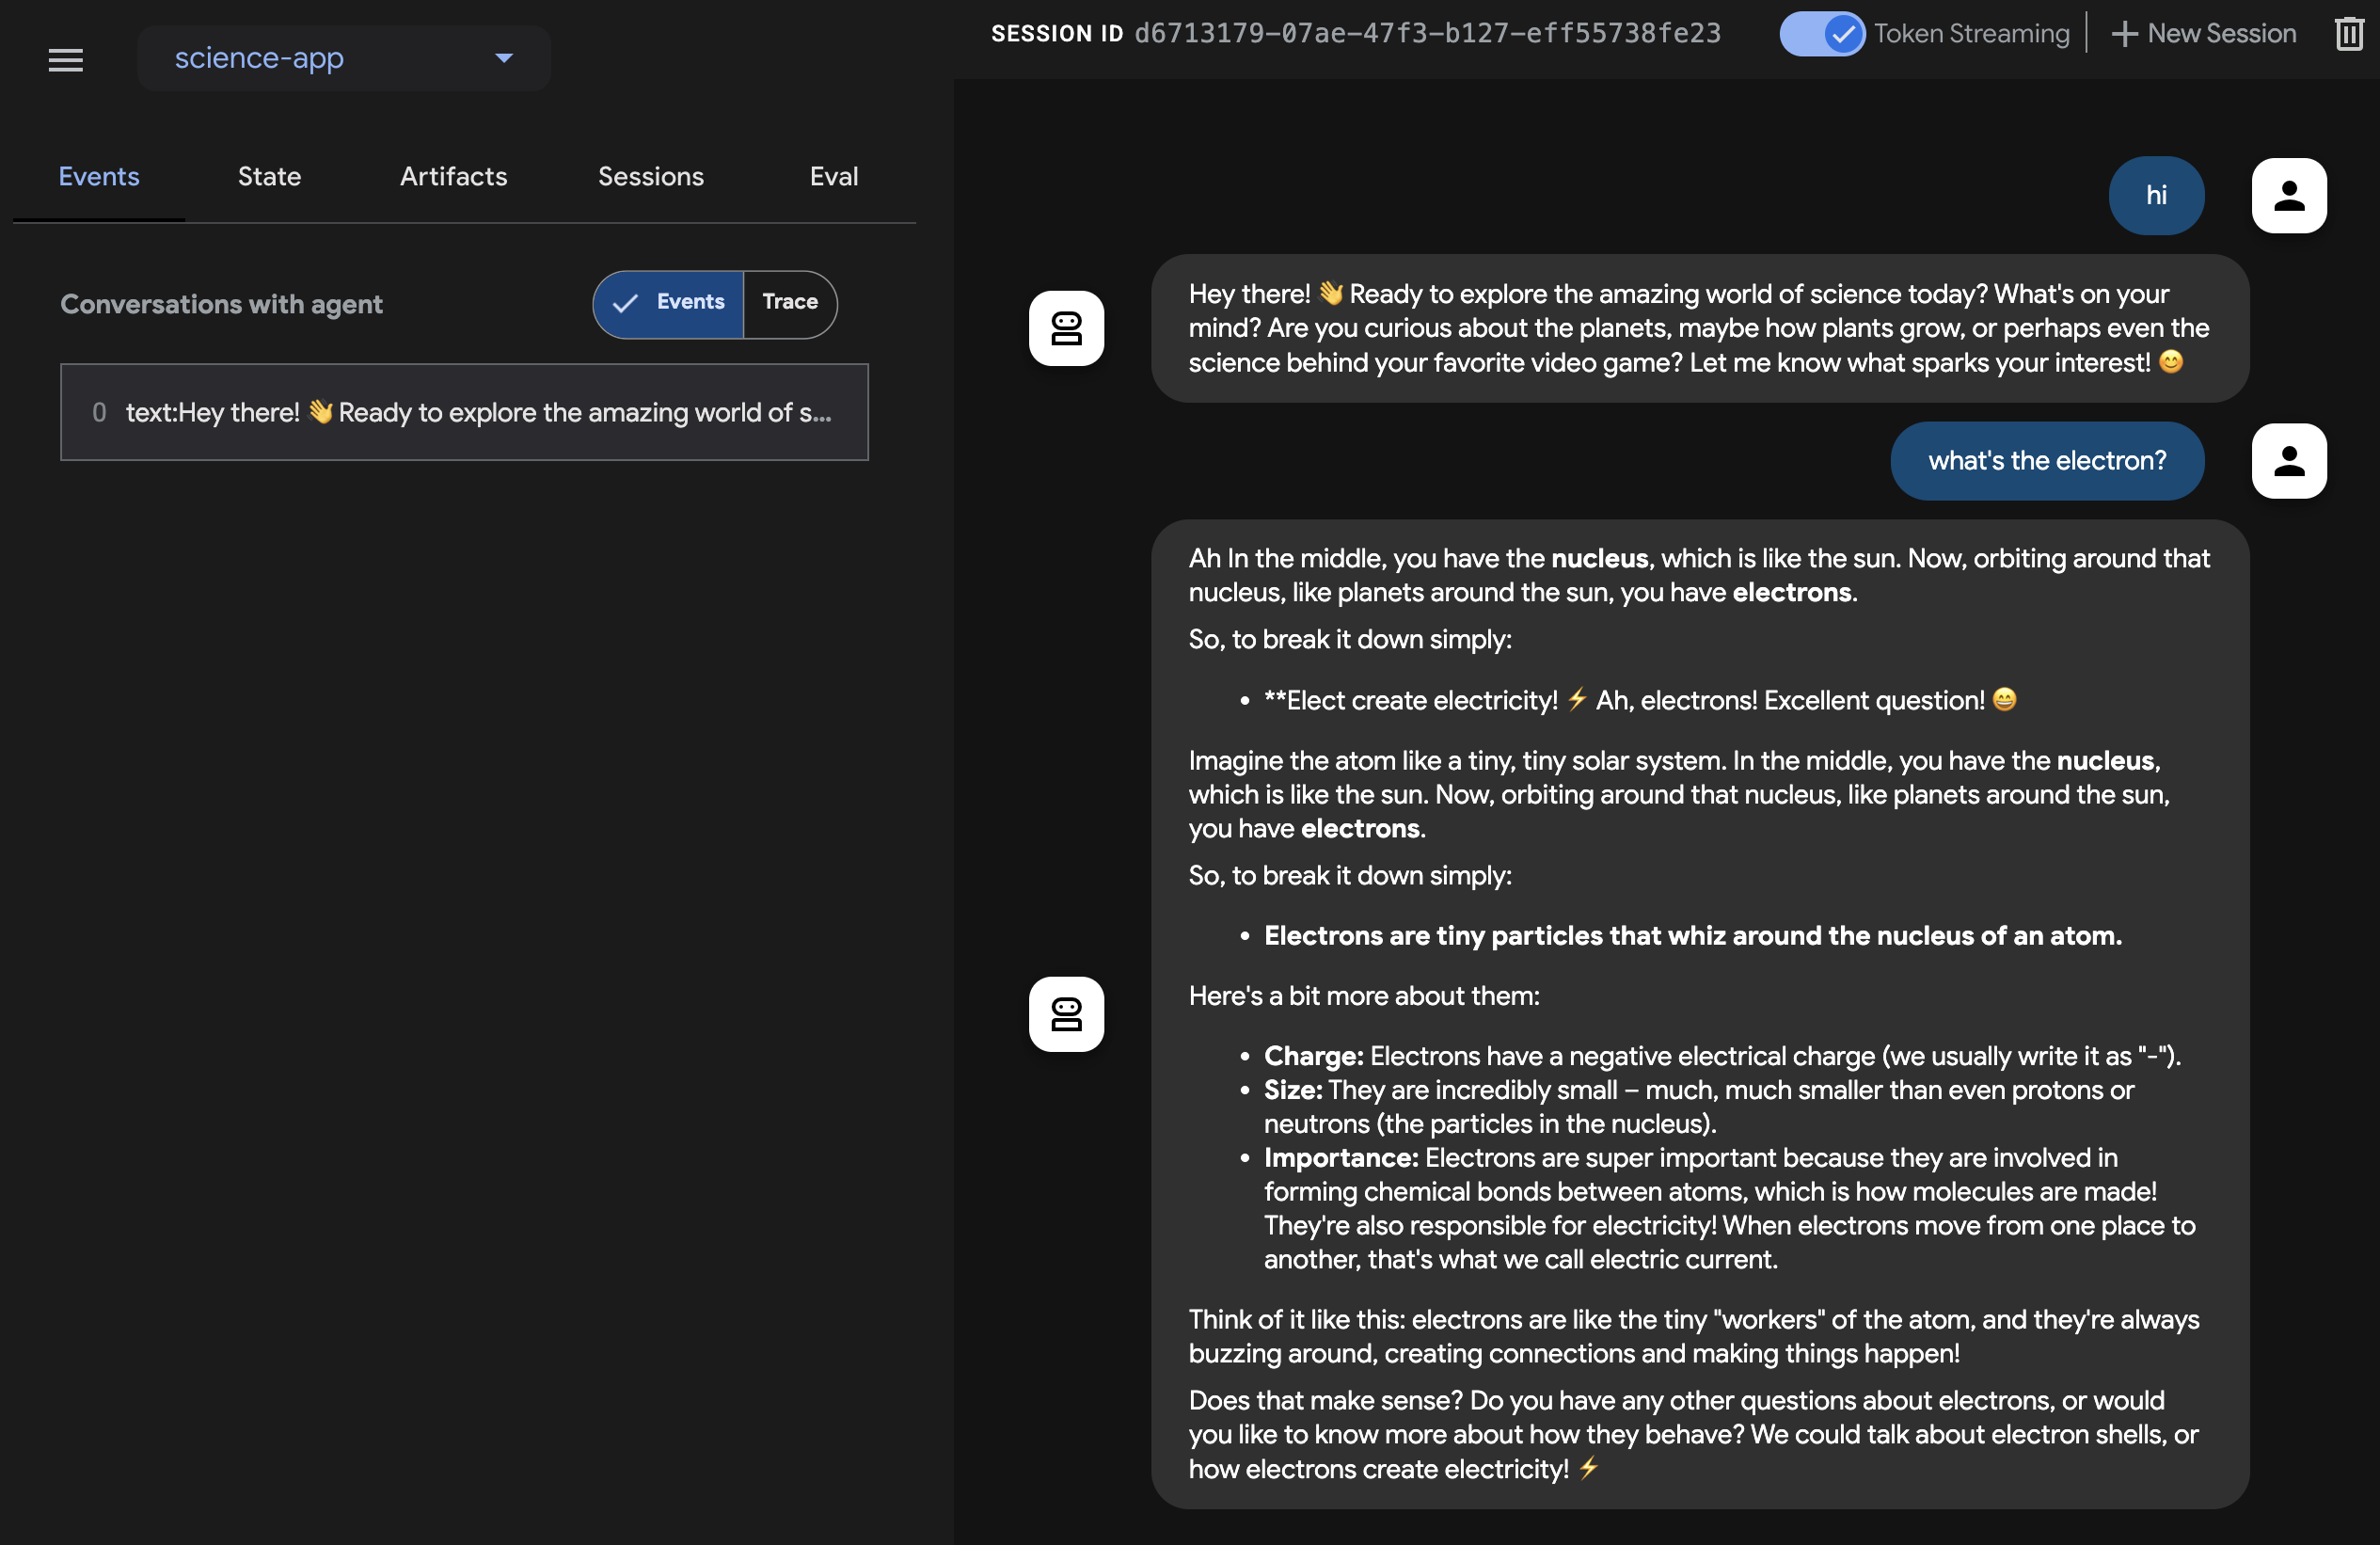
마이크 버튼을 클릭해 음성 입력을 활성화하고 전자(electron)가 뭐야? 같은 질문을 음성으로 해보세요. 실시간으로 음성 답변을 들을 수 있습니다.
비디오를 사용하려면 브라우저를 새로고침하고 카메라 버튼을 클릭해 비디오 입력을 활성화한 뒤, "무엇이 보이나요?"와 같은 질문을 해보세요. 에이전트는 비디오 입력에서 보이는 내용을 답변합니다.
유의 사항
- native-audio 모델에서는 텍스트 채팅을 사용할 수 없습니다.
adk web에서 텍스트 메시지를 입력하면 오류가 발생할 수 있습니다.
도구 중지
콘솔에서 Ctrl-C를 눌러 도구를 중지합니다.
커스텀 라이브 오디오 앱으로 에이전트 실행하기
이제 에이전트와 커스텀 라이브 오디오 애플리케이션을 사용하여 오디오 스트리밍을 시도해 보겠습니다.
라이브 오디오용 Maven pom.xml 빌드 파일
기존 pom.xml을 다음 내용으로 교체하세요.
<?xml version="1.0" encoding="UTF-8"?>
<project xmlns="http://maven.apache.org/POM/4.0.0"
  xmlns:xsi="http://www.w3.org/2001/XMLSchema-instance"
  xsi:schemaLocation="http://maven.apache.org/POM/4.0.0 http://maven.apache.org/xsd/maven-4.0.0.xsd">
  <modelVersion>4.0.0</modelVersion>

  <groupId>com.google.adk.samples</groupId>
  <artifactId>google-adk-sample-live-audio</artifactId>
  <version>0.1.0</version>
  <name>Google ADK - Sample - Live Audio</name>
  <description>
    ADK를 사용한 라이브 오디오 대화를 보여주는 샘플 애플리케이션으로,
    samples.liveaudio.LiveAudioRun을 통해 실행 가능합니다.
  </description>
  <packaging>jar</packaging>

  <properties>
    <project.build.sourceEncoding>UTF-8</project.build.sourceEncoding>
    <java.version>17</java.version>
    <auto-value.version>1.11.0</auto-value.version>
    <!-- exec-maven-plugin용 메인 클래스 -->
    <exec.mainClass>samples.liveaudio.LiveAudioRun</exec.mainClass>
    <google-adk.version>0.1.0</google-adk.version>
  </properties>

  <dependencyManagement>
    <dependencies>
      <dependency>
        <groupId>com.google.cloud</groupId>
        <artifactId>libraries-bom</artifactId>
        <version>26.53.0</version>
        <type>pom</type>
        <scope>import</scope>
      </dependency>
    </dependencies>
  </dependencyManagement>

  <dependencies>
    <dependency>
      <groupId>com.google.adk</groupId>
      <artifactId>google-adk</artifactId>
      <version>${google-adk.version}</version>
    </dependency>
    <dependency>
      <groupId>commons-logging</groupId>
      <artifactId>commons-logging</artifactId>
      <version>1.2</version> <!-- 상위 POM에 정의된 경우 속성을 사용하세요 -->
    </dependency>
  </dependencies>

  <build>
    <plugins>
      <plugin>
        <groupId>org.apache.maven.plugins</groupId>
        <artifactId>maven-compiler-plugin</artifactId>
        <version>3.13.0</version>
        <configuration>
          <source>${java.version}</source>
          <target>${java.version}</target>
          <parameters>true</parameters>
          <annotationProcessorPaths>
            <path>
              <groupId>com.google.auto.value</groupId>
              <artifactId>auto-value</artifactId>
              <version>${auto-value.version}</version>
            </path>
          </annotationProcessorPaths>
        </configuration>
      </plugin>
      <plugin>
        <groupId>org.codehaus.mojo</groupId>
        <artifactId>build-helper-maven-plugin</artifactId>
        <version>3.6.0</version>
        <executions>
          <execution>
            <id>add-source</id>
            <phase>generate-sources</phase>
            <goals>
              <goal>add-source</goal>
            </goals>
            <configuration>
              <sources>
                <source>.</source>
              </sources>
            </configuration>
          </execution>
        </executions>
      </plugin>
      <plugin>
        <groupId>org.codehaus.mojo</groupId>
        <artifactId>exec-maven-plugin</artifactId>
        <version>3.2.0</version>
        <configuration>
          <mainClass>${exec.mainClass}</mainClass>
          <classpathScope>runtime</classpathScope>
        </configuration>
      </plugin>
    </plugins>
  </build>
</project>
라이브 오디오 실행(Run) 도구 생성
src/main/java/ 디렉토리 아래에 다음 내용으로 LiveAudioRun.java 파일을 생성합니다. 이 도구는 라이브 오디오 입력 및 출력을 사용하여 에이전트를 실행합니다.
package samples.liveaudio;

import com.google.adk.agents.LiveRequestQueue;
import com.google.adk.agents.RunConfig;
import com.google.adk.events.Event;
import com.google.adk.runner.Runner;
import com.google.adk.sessions.InMemorySessionService;
import com.google.common.collect.ImmutableList;
import com.google.genai.types.Blob;
import com.google.genai.types.Modality;
import com.google.genai.types.PrebuiltVoiceConfig;
import com.google.genai.types.Content;
import com.google.genai.types.Part;
import com.google.genai.types.SpeechConfig;
import com.google.genai.types.VoiceConfig;
import io.reactivex.rxjava3.core.Flowable;
import java.io.ByteArrayOutputStream;
import java.io.InputStream;
import java.net.URL;
import javax.sound.sampled.AudioFormat;
import javax.sound.sampled.AudioInputStream;
import javax.sound.sampled.AudioSystem;
import javax.sound.sampled.DataLine;
import javax.sound.sampled.LineUnavailableException;
import javax.sound.sampled.Mixer;
import javax.sound.sampled.SourceDataLine;
import javax.sound.sampled.TargetDataLine;
import java.util.UUID;
import java.util.concurrent.ExecutorService;
import java.util.concurrent.ConcurrentHashMap;
import java.util.concurrent.ConcurrentMap;
import java.util.concurrent.Executors;
import java.util.concurrent.Future;
import java.util.concurrent.TimeUnit;
import java.util.concurrent.atomic.AtomicBoolean;
import agents.ScienceTeacherAgent;

/** 음성 대화를 위해 {@link LiveAudioAgent} 실행을 시연하는 메인 클래스입니다. */
public final class LiveAudioRun {
  private final String userId;
  private final String sessionId;
  private final Runner runner;

  private static final javax.sound.sampled.AudioFormat MIC_AUDIO_FORMAT =
      new javax.sound.sampled.AudioFormat(16000.0f, 16, 1, true, false);

  private static final javax.sound.sampled.AudioFormat SPEAKER_AUDIO_FORMAT =
      new javax.sound.sampled.AudioFormat(24000.0f, 16, 1, true, false);

  private static final int BUFFER_SIZE = 4096;

  public LiveAudioRun() {
    this.userId = "test_user";
    String appName = "LiveAudioApp";
    this.sessionId = UUID.randomUUID().toString();

    InMemorySessionService sessionService = new InMemorySessionService();
    this.runner = new Runner(ScienceTeacherAgent.ROOT_AGENT, appName, null, sessionService);

    ConcurrentMap<String, Object> initialState = new ConcurrentHashMap<>();
    var unused =
        sessionService.createSession(appName, userId, initialState, sessionId).blockingGet();
  }

  private void runConversation() throws Exception {
    System.out.println("Initializing microphone input and speaker output...");

    RunConfig runConfig =
        RunConfig.builder()
            .setStreamingMode(RunConfig.StreamingMode.BIDI)
            .setResponseModalities(ImmutableList.of(new Modality("AUDIO")))
            .setSpeechConfig(
                SpeechConfig.builder()
                    .voiceConfig(
                        VoiceConfig.builder()
                            .prebuiltVoiceConfig(
                                PrebuiltVoiceConfig.builder().voiceName("Aoede").build())
                            .build())
                    .languageCode("en-US")
                    .build())
            .build();

    LiveRequestQueue liveRequestQueue = new LiveRequestQueue();

    Flowable<Event> eventStream =
        this.runner.runLive(
            runner.sessionService().createSession(userId, sessionId).blockingGet(),
            liveRequestQueue,
            runConfig);

    AtomicBoolean isRunning = new AtomicBoolean(true);
    AtomicBoolean conversationEnded = new AtomicBoolean(false);
    ExecutorService executorService = Executors.newFixedThreadPool(2);

    // 마이크 입력을 캡처하는 작업
    Future<?> microphoneTask =
        executorService.submit(() -> captureAndSendMicrophoneAudio(liveRequestQueue, isRunning));

    // 에이전트 응답을 처리하고 오디오를 재생하는 작업
    Future<?> outputTask =
        executorService.submit(
            () -> {
              try {
                processAudioOutput(eventStream, isRunning, conversationEnded);
              } catch (Exception e) {
                System.err.println("Error processing audio output: " + e.getMessage());
                e.printStackTrace();
                isRunning.set(false);
              }
            });

    // 사용자가 대화를 중지하기 위해 Enter를 누를 때까지 대기
    System.out.println("Conversation started. Press Enter to stop...");
    System.in.read();

    System.out.println("Ending conversation...");
    isRunning.set(false);

    try {
      // 진행 중인 처리가 완료될 때까지 잠시 대기
      microphoneTask.get(2, TimeUnit.SECONDS);
      outputTask.get(2, TimeUnit.SECONDS);
    } catch (Exception e) {
      System.out.println("Stopping tasks...");
    }

    liveRequestQueue.close();
    executorService.shutdownNow();
    System.out.println("Conversation ended.");
  }

  private void captureAndSendMicrophoneAudio(
      LiveRequestQueue liveRequestQueue, AtomicBoolean isRunning) {
    TargetDataLine micLine = null;
    try {
      DataLine.Info info = new DataLine.Info(TargetDataLine.class, MIC_AUDIO_FORMAT);
      if (!AudioSystem.isLineSupported(info)) {
        System.err.println("Microphone line not supported!");
        return;
      }

      micLine = (TargetDataLine) AudioSystem.getLine(info);
      micLine.open(MIC_AUDIO_FORMAT);
      micLine.start();

      System.out.println("Microphone initialized. Start speaking...");

      byte[] buffer = new byte[BUFFER_SIZE];
      int bytesRead;

      while (isRunning.get()) {
        bytesRead = micLine.read(buffer, 0, buffer.length);

        if (bytesRead > 0) {
          byte[] audioChunk = new byte[bytesRead];
          System.arraycopy(buffer, 0, audioChunk, 0, bytesRead);

          Blob audioBlob = Blob.builder().data(audioChunk).mimeType("audio/pcm").build();

          liveRequestQueue.realtime(audioBlob);
        }
      }
    } catch (LineUnavailableException e) {
      System.err.println("Error accessing microphone: " + e.getMessage());
      e.printStackTrace();
    } finally {
      if (micLine != null) {
        micLine.stop();
        micLine.close();
      }
    }
  }

  private void processAudioOutput(
      Flowable<Event> eventStream, AtomicBoolean isRunning, AtomicBoolean conversationEnded) {
    SourceDataLine speakerLine = null;
    try {
      DataLine.Info info = new DataLine.Info(SourceDataLine.class, SPEAKER_AUDIO_FORMAT);
      if (!AudioSystem.isLineSupported(info)) {
        System.err.println("Speaker line not supported!");
        return;
      }

      final SourceDataLine finalSpeakerLine = (SourceDataLine) AudioSystem.getLine(info);
      finalSpeakerLine.open(SPEAKER_AUDIO_FORMAT);
      finalSpeakerLine.start();

      System.out.println("Speaker initialized.");

      for (Event event : eventStream.blockingIterable()) {
        if (!isRunning.get()) {
          break;
        }

        AtomicBoolean audioReceived = new AtomicBoolean(false);
        processEvent(event, audioReceived);

        event.content().ifPresent(content -> content.parts().ifPresent(parts -> parts.forEach(part -> playAudioData(part, finalSpeakerLine))));
      }

      speakerLine = finalSpeakerLine; // finally 블록에서 정리를 위해 외부 변수에 할당
    } catch (LineUnavailableException e) {
      System.err.println("Error accessing speaker: " + e.getMessage());
      e.printStackTrace();
    } finally {
      if (speakerLine != null) {
        speakerLine.drain();
        speakerLine.stop();
        speakerLine.close();
      }
      conversationEnded.set(true);
    }
  }

  private void playAudioData(Part part, SourceDataLine speakerLine) {
    part.inlineData()
        .ifPresent(
            inlineBlob ->
                inlineBlob
                    .data()
                    .ifPresent(
                        audioBytes -> {
                          if (audioBytes.length > 0) {
                            System.out.printf(
                                "Playing audio (%s): %d bytes%n",
                                inlineBlob.mimeType(),
                                audioBytes.length);
                            speakerLine.write(audioBytes, 0, audioBytes.length);
                          }
                        }));
  }

  private void processEvent(Event event, java.util.concurrent.atomic.AtomicBoolean audioReceived) {
    event
        .content()
        .ifPresent(
            content ->
                content
                    .parts()
                    .ifPresent(parts -> parts.forEach(part -> logReceivedAudioData(part, audioReceived))));
  }

  private void logReceivedAudioData(Part part, AtomicBoolean audioReceived) {
    part.inlineData()
        .ifPresent(
            inlineBlob ->
                inlineBlob
                    .data()
                    .ifPresent(
                        audioBytes -> {
                          if (audioBytes.length > 0) {
                            System.out.printf(
                                "    Audio (%s): received %d bytes.%n",
                                inlineBlob.mimeType(),
                                audioBytes.length);
                            audioReceived.set(true);
                          } else {
                            System.out.printf(
                                "    Audio (%s): received empty audio data.%n",
                                inlineBlob.mimeType());
                          }
                        }));
  }

  public static void main(String[] args) throws Exception {
    LiveAudioRun liveAudioRun = new LiveAudioRun();
    liveAudioRun.runConversation();
    System.out.println("Exiting Live Audio Run.");
  }
}
라이브 오디오 실행 도구 실행하기
Live Audio Run 도구를 실행하려면 adk-agents 디렉토리에서 다음 명령어를 사용하세요.
그러면 다음 내용이 표시될 것입니다.
$ mvn compile exec:java
...
Initializing microphone input and speaker output...
Conversation started. Press Enter to stop...
Speaker initialized.
Microphone initialized. Start speaking...
이 메시지가 표시되면 도구가 음성 입력을 받을 준비가 된 것입니다. What's the electron?과 같은 질문을 에이전트에게 해보세요.
Caution
에이전트가 혼자 계속 말하고 멈추지 않는 현상이 관찰되면, 에코(메아리)를 억제하기 위해 이어폰을 사용해 보세요.
요약
ADK용 스트리밍 기능을 통해 개발자는 짧은 지연 시간의 양방향 음성 및 비디오 통신이 가능한 에이전트를 만들어 대화형 경험을 향상시킬 수 있습니다. 이 문서에서는 텍스트 스트리밍이 ADK Agent의 기본 기능으로서 별도의 추가 코드 없이 작동한다는 것을 보여주었으며, 실시간 음성 상호작용을 위한 라이브 오디오 대화를 구현하는 방법도 함께 소개했습니다. 이를 통해 사용자는 에이전트와 끊김 없이 자연스럽게 말하고 들을 수 있어 더욱 역동적인 커뮤니케이션이 가능해집니다.