멀티-툴 에이전트 구축하기
이 빠른 시작은 ADK(Agent Development Kit)를 설치하고, 여러 도구가 포함된 기본 에이전트를 설정하고, 터미널 또는 대화형 브라우저 기반 개발 UI에서 로컬로 실행하는 방법을 안내합니다.
이 빠른 시작은 Python 3.10+ 또는 Java 17+ 및 터미널 액세스가 가능한 로컬 IDE(VS Code, PyCharm, IntelliJ IDEA 등)를 가정합니다. 이 방법은 애플리케이션을 머신에서 완전히 실행하며 내부 개발에 권장됩니다.
1. 환경 설정 및 ADK 설치
가상 환경 생성 및 활성화(권장):
# 생성
python3 -m venv .venv
# 활성화(새 터미널마다)
# macOS/Linux: source .venv/bin/activate
# Windows CMD: .venv\Scripts\activate.bat
# Windows PowerShell: .venv\Scripts\Activate.ps1
ADK 설치:
새 프로젝트 디렉터리를 만들고 초기화한 다음, 종속성을 설치합니다:
mkdir my-adk-agent
cd my-adk-agent
npm init -y
npm install @google/adk @google/adk-devtools
npm install -D typescript
다음 내용으로 tsconfig.json 파일을 만드세요. 이 설정은 프로젝트가 최신 Node.js 모듈을 올바르게 처리하도록 보장합니다.
ADK Java를 설치하고 환경을 설정하려면 Java Quickstart를 참고하세요.
ADK Kotlin을 설치하고 환경을 설정하려면 Kotlin Quickstart를 참고하세요.
2. 에이전트 프로젝트 생성
프로젝트 구조
다음과 같은 프로젝트 구조를 생성해야 합니다.
multi_tool_agent 폴더 생성:
Windows 사용자 참고 사항
다음 몇 단계에서 Windows에서 ADK를 사용할 때 다음 명령(mkdir, echo)이 일반적으로 null 바이트 및/또는 잘못된 인코딩으로 파일을 생성하므로 파일 탐색기 또는 IDE를 사용하여 Python 파일을 만드는 것이 좋습니다.
__init__.py
이제 폴더에 __init__.py 파일을 생성합니다.
__init__.py는 이제 다음과 같아야 합니다.
agent.py
동일한 폴더에 agent.py 파일을 생성합니다.
다음 코드를 agent.py에 복사하여 붙여넣습니다.
# Copyright 2026 Google LLC
#
# Licensed under the Apache License, Version 2.0 (the "License");
# you may not use this file except in compliance with the License.
# You may obtain a copy of the License at
#
#     http://www.apache.org/licenses/LICENSE-2.0
#
# Unless required by applicable law or agreed to in writing, software
# distributed under the License is distributed on an "AS IS" BASIS,
# WITHOUT WARRANTIES OR CONDITIONS OF ANY KIND, either express or implied.
# See the License for the specific language governing permissions and
# limitations under the License.

import datetime
from zoneinfo import ZoneInfo
from google.adk.agents import Agent

def get_weather(city: str) -> dict:
    """Retrieves the current weather report for a specified city.

    Args:
        city (str): The name of the city for which to retrieve the weather report.

    Returns:
        dict: status and result or error msg.
    """
    if city.lower() == "new york":
        return {
            "status": "success",
            "report": (
                "The weather in New York is sunny with a temperature of 25 degrees"
                " Celsius (77 degrees Fahrenheit)."
            ),
        }
    else:
        return {
            "status": "error",
            "error_message": f"Weather information for '{city}' is not available.",
        }


def get_current_time(city: str) -> dict:
    """Returns the current time in a specified city.

    Args:
        city (str): The name of the city for which to retrieve the current time.

    Returns:
        dict: status and result or error msg.
    """

    if city.lower() == "new york":
        tz_identifier = "America/New_York"
    else:
        return {
            "status": "error",
            "error_message": (
                f"Sorry, I don't have timezone information for {city}."
            ),
        }

    tz = ZoneInfo(tz_identifier)
    now = datetime.datetime.now(tz)
    report = (
        f'The current time in {city} is {now.strftime("%Y-%m-%d %H:%M:%S %Z%z")}'
    )
    return {"status": "success", "report": report}


root_agent = Agent(
    name="weather_time_agent",
    model="gemini-flash-latest",
    description=(
        "Agent to answer questions about the time and weather in a city."
    ),
    instruction=(
        "You are a helpful agent who can answer user questions about the time and weather in a city."
    ),
    tools=[get_weather, get_current_time],
)
.env
동일한 폴더에 .env 파일을 생성합니다.
이 파일에 대한 추가 지침은 모델 설정 섹션에 설명되어 있습니다.
my-adk-agent 디렉터리에 다음과 같은 프로젝트 구조를 만들어야 합니다:
agent.ts
프로젝트 폴더에 agent.ts 파일을 만듭니다:
다음 코드를 agent.ts에 복사하여 붙여넣습니다:
import 'dotenv/config';
import { FunctionTool, LlmAgent } from '@google/adk';
import { z } from 'zod';

const getWeather = new FunctionTool({
  name: 'get_weather',
  description: 'Retrieves the current weather report for a specified city.',
  parameters: z.object({
    city: z.string().describe('The name of the city for which to retrieve the weather report.'),
  }),
  execute: ({ city }) => {
    if (city.toLowerCase() === 'new york') {
      return {
        status: 'success',
        report:
          'The weather in New York is sunny with a temperature of 25 degrees Celsius (77 degrees Fahrenheit).',
      };
    } else {
      return {
        status: 'error',
        error_message: `Weather information for '${city}' is not available.`,
      };
    }
  },
});

const getCurrentTime = new FunctionTool({
  name: 'get_current_time',
  description: 'Returns the current time in a specified city.',
  parameters: z.object({
    city: z.string().describe("The name of the city for which to retrieve the current time."),
  }),
  execute: ({ city }) => {
    let tz_identifier: string;
    if (city.toLowerCase() === 'new york') {
      tz_identifier = 'America/New_York';
    } else {
      return {
        status: 'error',
        error_message: `Sorry, I don't have timezone information for ${city}.`,
      };
    }

    const now = new Date();
    const report = `The current time in ${city} is ${now.toLocaleString('en-US', { timeZone: tz_identifier })}`;

    return { status: 'success', report: report };
  },
});

export const rootAgent = new LlmAgent({
  name: 'weather_time_agent',
  model: 'gemini-flash-latest',
  description: 'Agent to answer questions about the time and weather in a city.',
  instruction: 'You are a helpful agent who can answer user questions about the time and weather in a city.',
  tools: [getWeather, getCurrentTime],
});
.env
같은 폴더에 .env 파일을 만듭니다:
이 파일에 대한 추가 지침은 다음 모델 설정 섹션에서 설명합니다.
Java 프로젝트는 일반적으로 다음과 같은 프로젝트 구조를 가집니다.
project_folder/
├── pom.xml (또는 build.gradle)
├── src/
├── └── main/
│       └── java/
│           └── agents/
│               └── multitool/
└── test/
MultiToolAgent.java 생성
src/main/java/agents/multitool/ 디렉토리의 agents.multitool 패키지에 MultiToolAgent.java 소스 파일을 생성합니다.
다음 코드를 MultiToolAgent.java에 복사하여 붙여넣습니다.
package agents.multitool;

import com.google.adk.agents.BaseAgent;
import com.google.adk.agents.LlmAgent;
import com.google.adk.events.Event;
import com.google.adk.runner.InMemoryRunner;
import com.google.adk.sessions.Session;
import com.google.adk.tools.Annotations.Schema;
import com.google.adk.tools.FunctionTool;
import com.google.genai.types.Content;
import com.google.genai.types.Part;
import io.reactivex.rxjava3.core.Flowable;
import java.nio.charset.StandardCharsets;
import java.text.Normalizer;
import java.time.ZoneId;
import java.time.ZonedDateTime;
import java.time.format.DateTimeFormatter;
import java.util.Map;
import java.util.Scanner;

public class MultiToolAgent {

    private static String USER_ID = "student";
    private static String NAME = "multi_tool_agent";

    // The run your agent with Dev UI, the ROOT_AGENT should be a global public static final variable.
    public static final BaseAgent ROOT_AGENT = initAgent();

    public static BaseAgent initAgent() {
        return LlmAgent.builder()
            .name(NAME)
            .model("gemini-flash-latest")
            .description("Agent to answer questions about the time and weather in a city.")
            .instruction(
                "You are a helpful agent who can answer user questions about the time and weather"
                    + " in a city.")
            .tools(
                FunctionTool.create(MultiToolAgent.class, "getCurrentTime"),
                FunctionTool.create(MultiToolAgent.class, "getWeather"))
            .build();
    }

    public static Map<String, String> getCurrentTime(
        @Schema(name = "city",
                description = "The name of the city for which to retrieve the current time")
        String city) {
        String normalizedCity =
            Normalizer.normalize(city, Normalizer.Form.NFD)
                .trim()
                .toLowerCase()
                .replaceAll("(\\p{IsM}+|\\p{IsP}+)", "")
                .replaceAll("\\s+", "_");

        return ZoneId.getAvailableZoneIds().stream()
            .filter(zid -> zid.toLowerCase().endsWith("/" + normalizedCity))
            .findFirst()
            .map(
                zid ->
                    Map.of(
                        "status",
                        "success",
                        "report",
                        "The current time in "
                            + city
                            + " is "
                            + ZonedDateTime.now(ZoneId.of(zid))
                            .format(DateTimeFormatter.ofPattern("HH:mm"))
                            + "."))
            .orElse(
                Map.of(
                    "status",
                    "error",
                    "report",
                    "Sorry, I don't have timezone information for " + city + "."));
    }

    public static Map<String, String> getWeather(
        @Schema(name = "city",
                description = "The name of the city for which to retrieve the weather report")
        String city) {
        if (city.toLowerCase().equals("new york")) {
            return Map.of(
                "status",
                "success",
                "report",
                "The weather in New York is sunny with a temperature of 25 degrees Celsius (77 degrees"
                    + " Fahrenheit).");

        } else {
            return Map.of(
                "status", "error", "report", "Weather information for " + city + " is not available.");
        }
    }

    public static void main(String[] args) throws Exception {
        InMemoryRunner runner = new InMemoryRunner(ROOT_AGENT);

        Session session =
            runner
                .sessionService()
                .createSession(NAME, USER_ID)
                .blockingGet();

        try (Scanner scanner = new Scanner(System.in, StandardCharsets.UTF_8)) {
            while (true) {
                System.out.print("\nYou > ");
                String userInput = scanner.nextLine();

                if ("quit".equalsIgnoreCase(userInput)) {
                    break;
                }

                Content userMsg = Content.fromParts(Part.fromText(userInput));
                Flowable<Event> events = runner.runAsync(USER_ID, session.id(), userMsg);

                System.out.print("\nAgent > ");
                events.blockingForEach(event -> System.out.println(event.stringifyContent()));
            }
        }
    }
}
Kotlin 프로젝트는 일반적으로 다음 프로젝트 구조를 사용합니다.
project_folder/
├── build.gradle.kts
├── src/
├── └── main/
│       └── kotlin/
│           └── agents/
│               └── multitool/
MultiToolAgent.kt 생성
src/main/kotlin/agents/multitool/ 디렉터리에 MultiToolAgent.kt 소스 파일을 만듭니다.
다음 코드를 MultiToolAgent.kt에 복사하여 붙여넣습니다.
package agents.multitool

import com.google.adk.kt.agents.Instruction
import com.google.adk.kt.agents.LlmAgent
import com.google.adk.kt.annotations.Param
import com.google.adk.kt.annotations.Tool
import com.google.adk.kt.models.Gemini
import com.google.adk.kt.runners.InMemoryRunner
import com.google.adk.kt.sessions.InMemorySessionService
import com.google.adk.kt.sessions.SessionKey
import com.google.adk.kt.types.Content
import com.google.adk.kt.types.Part
import com.google.adk.kt.types.Role
import kotlinx.coroutines.flow.toList
import kotlinx.coroutines.runBlocking
import java.text.Normalizer
import java.time.ZoneId
import java.time.ZonedDateTime
import java.time.format.DateTimeFormatter
import java.util.Scanner

class MultiToolService {
    @Tool
    fun getCurrentTime(
        @Param("The name of the city for which to retrieve the current time") city: String,
    ): Map<String, String> {
        val normalizedCity =
            Normalizer.normalize(city, Normalizer.Form.NFD)
                .trim()
                .lowercase()
                .replace(Regex("(\\p{IsM}+|\\p{IsP}+)"), "")
                .replace(Regex("\\s+"), "_")

        val zoneId =
            ZoneId.getAvailableZoneIds()
                .firstOrNull { it.lowercase().endsWith("/$normalizedCity") }

        return if (zoneId != null) {
            val time =
                ZonedDateTime.now(ZoneId.of(zoneId))
                    .format(DateTimeFormatter.ofPattern("HH:mm"))
            mapOf(
                "status" to "success",
                "report" to "The current time in $city is $time.",
            )
        } else {
            mapOf(
                "status" to "error",
                "report" to "Sorry, I don't have timezone information for $city.",
            )
        }
    }

    @Tool
    fun getWeather(
        @Param("The name of the city for which to retrieve the weather report") city: String,
    ): Map<String, String> {
        return if (city.lowercase() == "new york") {
            mapOf(
                "status" to "success",
                "report" to "The weather in New York is sunny with a temperature of " +
                    "25 degrees Celsius (77 degrees Fahrenheit).",
            )
        } else {
            mapOf(
                "status" to "error",
                "report" to "Weather information for $city is not available.",
            )
        }
    }
}

fun main() =
    runBlocking {
        val model = Gemini(name = "gemini-flash-latest")

        val agent =
            LlmAgent(
                name = "multi_tool_agent",
                model = model,
                description = "Agent to answer questions about the time and weather in a city.",
                instruction =
                    Instruction(
                        "You are a helpful agent who can answer user questions about the " +
                            "time and weather in a city.",
                    ),
                tools = MultiToolService().generatedTools(),
            )

        val sessionService = InMemorySessionService()
        val runner =
            InMemoryRunner(
                agent = agent,
                appName = "multi_tool_app",
                sessionService = sessionService,
            )

        val userId = "student"
        val sessionId = "session_1"

        sessionService.createSession(SessionKey("multi_tool_app", userId, sessionId))

        val scanner = Scanner(System.`in`)
        while (true) {
            print("\nYou > ")
            val userInput = scanner.nextLine()
            if (userInput.lowercase() == "quit") break

            val userContent = Content(role = Role.USER, parts = listOf(Part(text = userInput)))
            val events =
                runner.runAsync(
                    userId = userId,
                    sessionId = sessionId,
                    newMessage = userContent,
                ).toList()

            print("\nAgent > ")
            for (event in events) {
                event.content?.parts?.forEach { part ->
                    part.text?.let { print(it) }
                }
            }
            println()
        }
    }
다음과 같은 프로젝트 구조를 생성해야 합니다.
agent.go
프로젝트 폴더에 agent.go 파일을 만듭니다.
다음 코드를 agent.go에 복사하여 붙여넣습니다.
package main

import (
    "context"
    "log"
    "os"
    "strings"
    "time"

    "google.golang.org/genai"

    "google.golang.org/adk/v2/agent"
    "google.golang.org/adk/v2/agent/llmagent"
    "google.golang.org/adk/v2/cmd/launcher"
    "google.golang.org/adk/v2/cmd/launcher/full"
    "google.golang.org/adk/v2/model/gemini"
    "google.golang.org/adk/v2/tool"
    "google.golang.org/adk/v2/tool/functiontool"
)

type CityArgs struct {
    City string `json:"city"`
}

func main() {
    ctx := context.Background()

    // 1. Setup the model.
    // Note: Authentication is handled via GOOGLE_API_KEY environment variable.
    model, err := gemini.NewModel(ctx, "gemini-flash-latest", &genai.ClientConfig{
        APIKey: os.Getenv("GOOGLE_API_KEY"),
    })
    if err != nil {
        log.Fatalf("Failed to create model: %v", err)
    }

    weatherTool, err := functiontool.New[CityArgs, map[string]any](
        functiontool.Config{
            Name:        "get_weather",
            Description: "Retrieves the current weather report for a specified city.",
        },
        func(ctx agent.Context, args CityArgs) (map[string]any, error) {
            if strings.EqualFold(args.City, "new york") {
                return map[string]any{
                    "status": "success",
                    "report": "The weather in New York is sunny with a temperature of 25 degrees Celsius (77 degrees Fahrenheit).",
                }, nil
            }
            return map[string]any{
                "status":        "error",
                "error_message": "Weather information for '" + args.City + "' is not available.",
            }, nil
        },
    )
    if err != nil {
        log.Fatalf("Failed to create get_weather tool: %v", err)
    }

    currentTimeTool, err := functiontool.New[CityArgs, map[string]any](
        functiontool.Config{
            Name:        "get_current_time",
            Description: "Returns the current time in a specified city.",
        },
        func(ctx agent.Context, args CityArgs) (map[string]any, error) {
            var tzIdentifier string
            if strings.EqualFold(args.City, "new york") {
                tzIdentifier = "America/New_York"
            } else {
                return map[string]any{
                    "status":        "error",
                    "error_message": "Sorry, I don't have timezone information for " + args.City + ".",
                }, nil
            }

            tz, err := time.LoadLocation(tzIdentifier)
            if err != nil {
                return nil, err
            }

            now := time.Now().In(tz)
            report := "The current time in " + args.City + " is " + now.Format("2006-01-02 15:04:05 MST-0700")
            return map[string]any{
                "status": "success",
                "report": report,
            }, nil
        },
    )
    if err != nil {
        log.Fatalf("Failed to create get_current_time tool: %v", err)
    }

    // 2. Define the agent.
    a, err := llmagent.New(llmagent.Config{
        Name:        "weather_time_agent",
        Model:       model,
        Description: "Agent to answer questions about the time and weather in a city.",
        Instruction: "You are a helpful agent who can answer user questions about the time and weather in a city.",
        Tools: []tool.Tool{
            weatherTool,
            currentTimeTool,
        },
    })
    if err != nil {
        log.Fatalf("Failed to create agent: %v", err)
    }

    // 3. Configure the launcher and run.
    config := &launcher.Config{
        AgentLoader: agent.NewSingleLoader(a),
    }

    l := full.NewLauncher()
    if err = l.Execute(ctx, config, os.Args[1:]); err != nil {
        log.Fatalf("Run failed: %v\n\n%s", err, l.CommandLineSyntax())
    }
}
.env
같은 폴더에 .env 파일을 만듭니다.
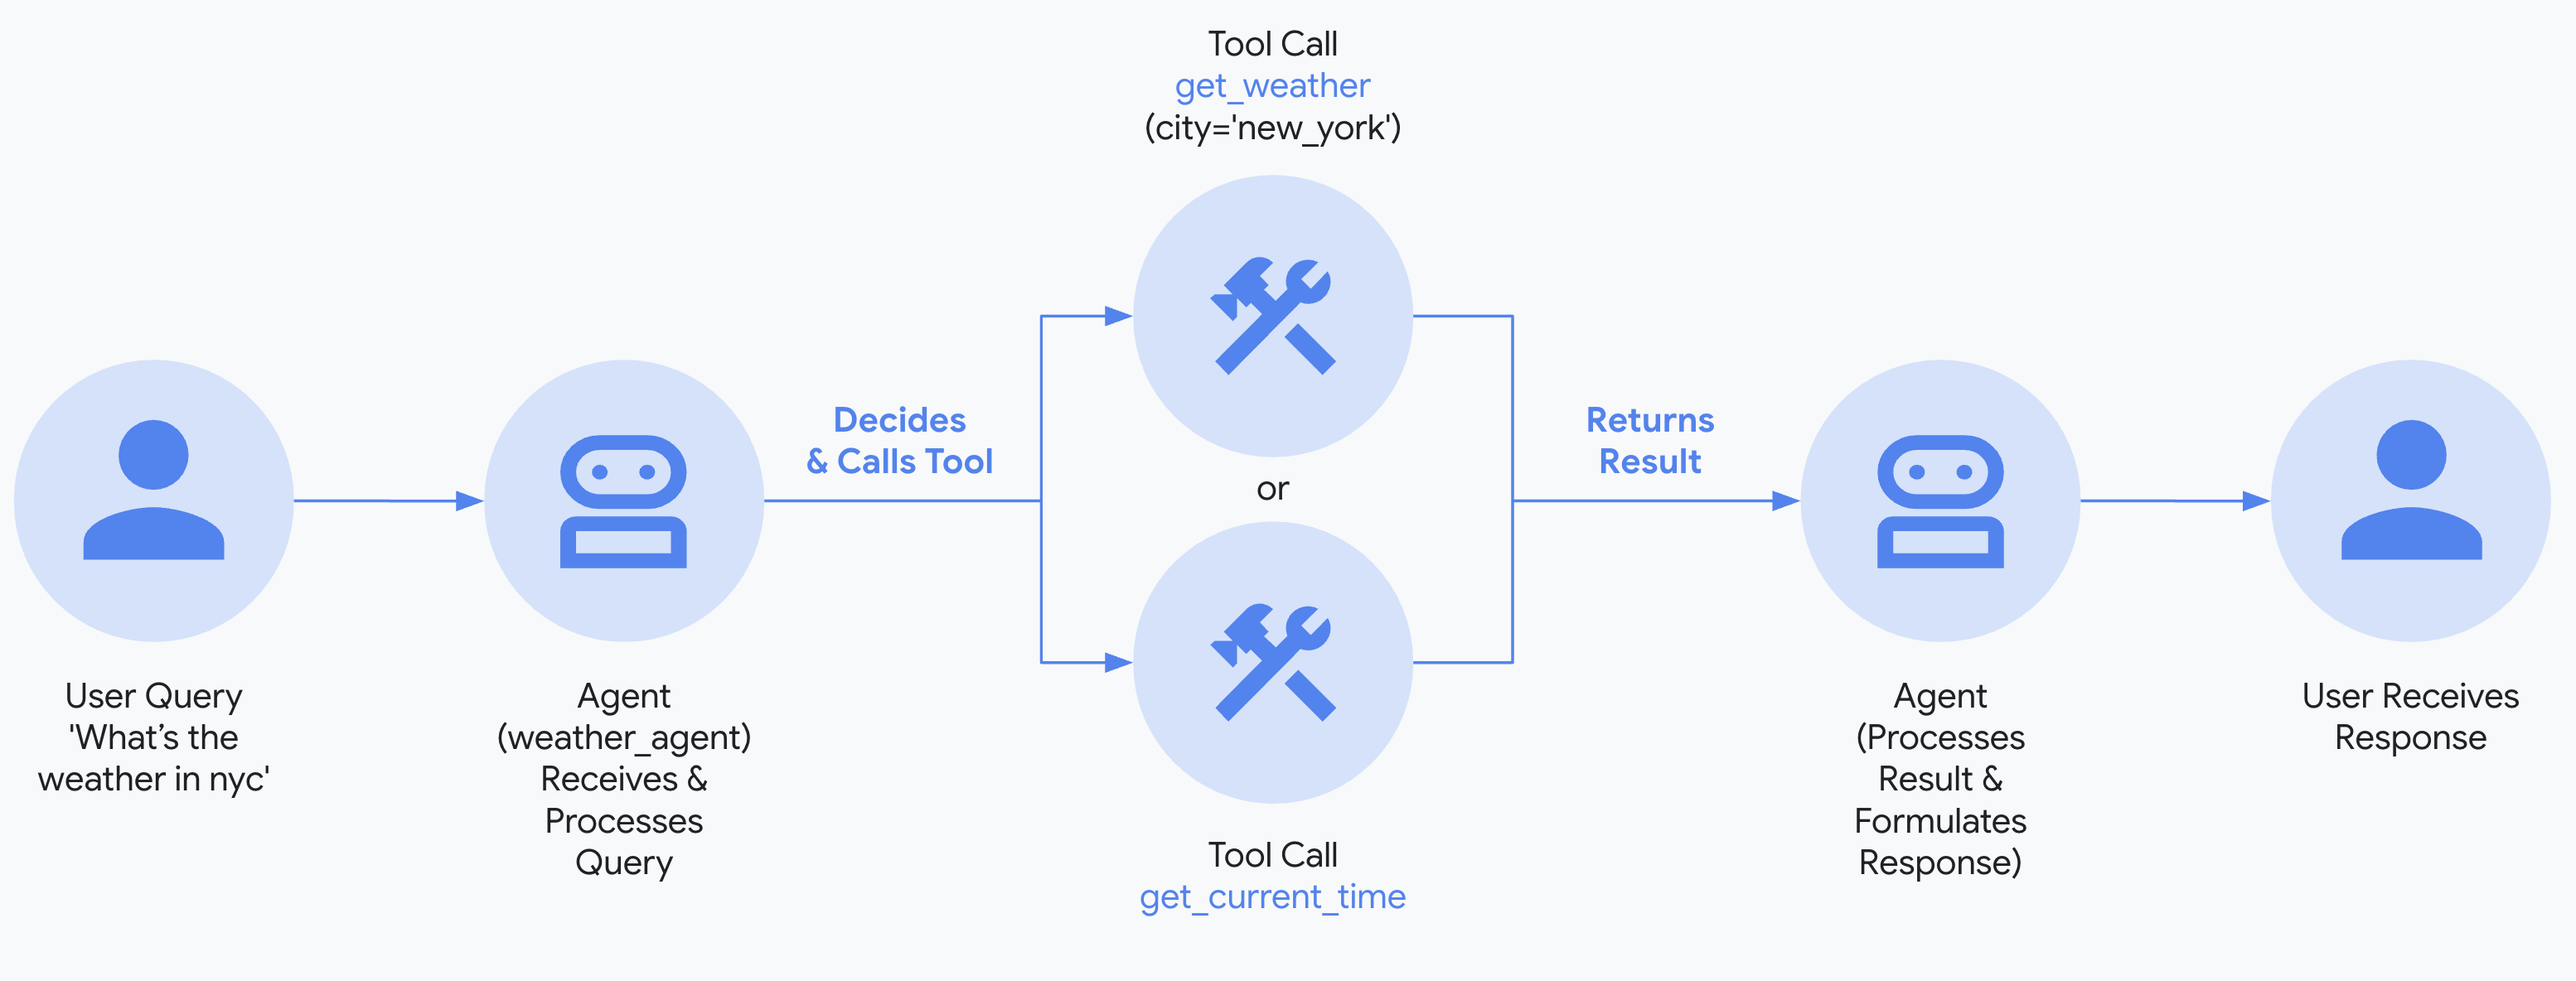
3. 모델 설정
에이전트가 사용자 요청을 이해하고 응답을 생성하는 기능은 LLM(대규모 언어 모델)에 의해 구동됩니다. 에이전트는 이 외부 LLM 서비스에 보안 호출을 수행해야 하며, 이는 인증 자격 증명이 필요합니다. 유효한 인증 없이는 LLM 서비스가 에이전트의 요청을 거부하고 에이전트는 작동할 수 없습니다.
모델 인증 가이드
다양한 모델에 대한 인증에 대한 자세한 가이드는 인증 가이드를 참고하세요. 이것은 에이전트가 LLM 서비스에 호출을 할 수 있도록 하는 중요한 단계입니다.
- Google AI Studio에서 API 키를 가져옵니다.
-
Python을 사용하는 경우 (
multi_tool_agent/) 내에 있는.env파일을 열고 다음 코드를 복사하여 붙여넣습니다.multi_tool_agent/.envGOOGLE_GENAI_USE_ENTERPRISE=FALSE GOOGLE_API_KEY=PASTE_YOUR_ACTUAL_API_KEY_HEREJava를 사용하는 경우 환경 변수를 정의합니다.
terminalexport GOOGLE_GENAI_USE_ENTERPRISE=FALSE export GOOGLE_API_KEY=PASTE_YOUR_ACTUAL_API_KEY_HERETypeScript를 사용하는 경우
.env파일은agent.ts파일 상단의import 'dotenv/config';줄에 의해 자동으로 로드됩니다.multi_tool_agent/.envGOOGLE_GENAI_USE_ENTERPRISE=FALSE GOOGLE_GENAI_API_KEY=PASTE_YOUR_ACTUAL_API_KEY_HEREGo를 사용하는 경우 터미널에서 환경 변수를 정의하거나
.env파일을 사용합니다: -
PASTE_YOUR_ACTUAL_API_KEY_HERE를 실제API KEY로 바꿉니다.
- Google Cloud 프로젝트를 설정하고 Vertex AI API를 활성화합니다.
- gcloud CLI를 설정합니다.
- 터미널에서
gcloud auth application-default login을 실행하여 Google Cloud에 인증합니다. -
Python을 사용하는 경우 (
multi_tool_agent/) 내에 있는.env파일을 엽니다. 다음 코드를 복사하여 붙여넣고 프로젝트 ID와 위치를 업데이트합니다.multi_tool_agent/.envGOOGLE_GENAI_USE_ENTERPRISE=TRUE GOOGLE_CLOUD_PROJECT=YOUR_PROJECT_ID GOOGLE_CLOUD_LOCATION=LOCATIONJava를 사용하는 경우 환경 변수를 정의합니다.
terminalexport GOOGLE_GENAI_USE_ENTERPRISE=TRUE export GOOGLE_CLOUD_PROJECT=YOUR_PROJECT_ID export GOOGLE_CLOUD_LOCATION=LOCATIONTypeScript를 사용하는 경우
.env파일은agent.ts파일 상단의import 'dotenv/config';줄에 의해 자동으로 로드됩니다.multi_tool_agent/.envGOOGLE_GENAI_USE_ENTERPRISE=TRUE GOOGLE_CLOUD_PROJECT=YOUR_PROJECT_ID GOOGLE_CLOUD_LOCATION=LOCATIONGo를 사용하는 경우 터미널에서 환경 변수를 정의하거나
.env파일을 사용합니다:
- 무료 Google Cloud 프로젝트에 가입하고 적격 계정으로 Gemini를 무료로 사용할 수 있습니다!
- Vertex AI Express 모드가 포함된 Google Cloud 프로젝트를 설정합니다.
- Express 모드 프로젝트에서 API 키를 가져옵니다. 이 키는 ADK와 함께 Gemini 모델을 무료로 사용하고 Agent Engine 서비스에 액세스하는 데 사용할 수 있습니다.
-
Python을 사용하는 경우 (
multi_tool_agent/) 내에 있는.env파일을 엽니다. 다음 코드를 복사하여 붙여넣고 프로젝트 ID와 위치를 업데이트합니다.multi_tool_agent/.envGOOGLE_GENAI_USE_ENTERPRISE=TRUE GOOGLE_API_KEY=PASTE_YOUR_ACTUAL_EXPRESS_MODE_API_KEY_HEREJava를 사용하는 경우 환경 변수를 정의합니다.
terminalexport GOOGLE_GENAI_USE_ENTERPRISE=TRUE export GOOGLE_API_KEY=PASTE_YOUR_ACTUAL_EXPRESS_MODE_API_KEY_HERETypeScript를 사용하는 경우
.env파일은agent.ts파일 상단의import 'dotenv/config';줄에 의해 자동으로 로드됩니다.multi_tool_agent/.envGOOGLE_GENAI_USE_ENTERPRISE=TRUE GOOGLE_GENAI_API_KEY=PASTE_YOUR_ACTUAL_EXPRESS_MODE_API_KEY_HEREGo를 사용하는 경우 터미널에서 환경 변수를 정의하거나
.env파일을 사용합니다:
4. 에이전트 실행
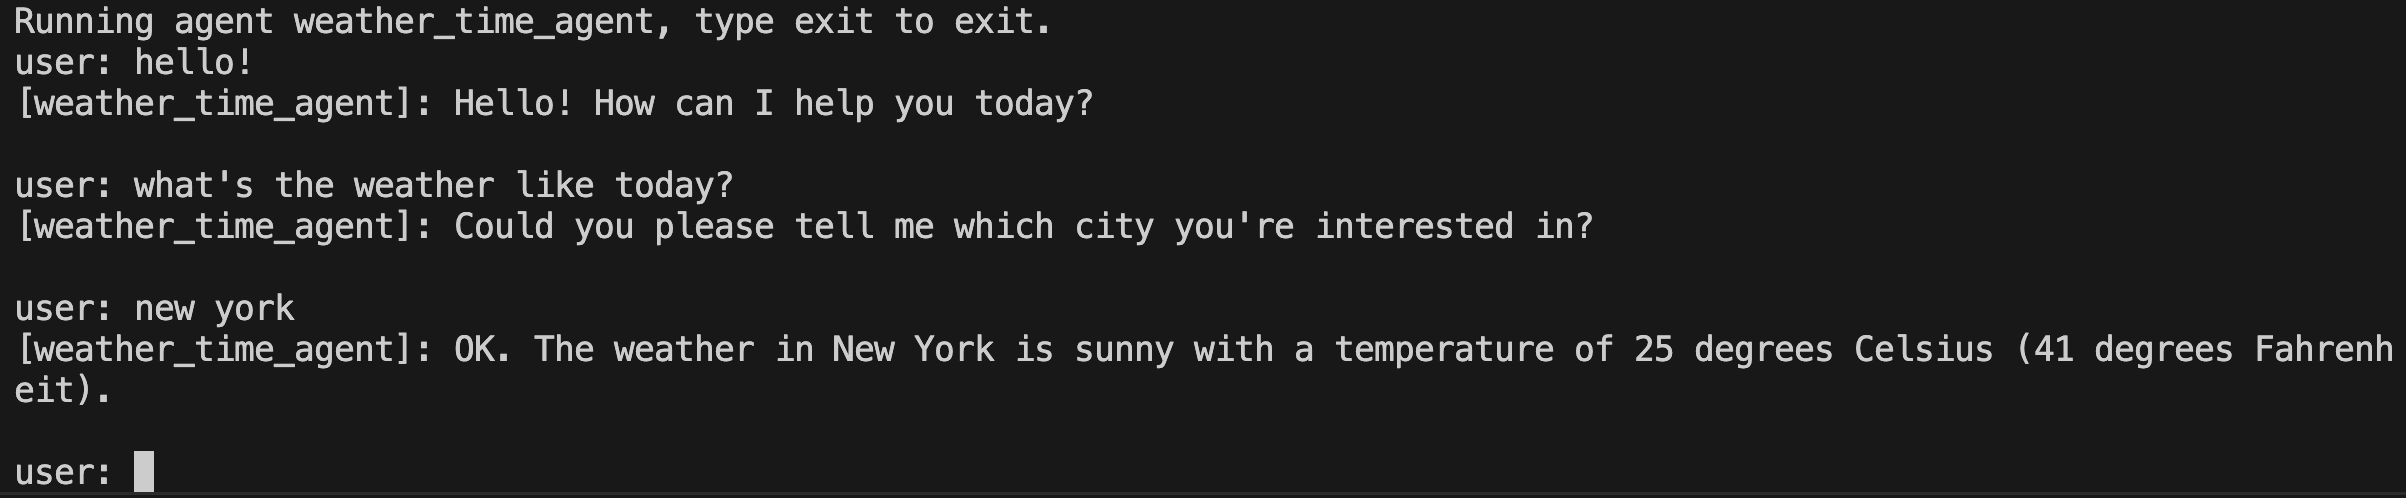
터미널을 사용하여 에이전트 프로젝트의 상위 디렉토리로 이동합니다(예: cd .. 사용).
에이전트와 상호 작용하는 여러 가지 방법이 있습니다.
Vertex AI 사용자 인증 설정
이전 단계에서 "Gemini - Google Cloud Vertex AI"를 선택한 경우 개발 UI를 시작하기 전에 Google Cloud로 인증해야 합니다.
이 명령을 실행하고 프롬프트에 따릅니다.
참고: "Gemini - Google AI Studio"를 사용하는 경우 이 단계를 건너뛰십시오.
다음 명령을 실행하여 개발 UI를 시작합니다.
Windows 사용자 참고 사항
_make_subprocess_transport NotImplementedError가 발생하는 경우 대신 adk web --no-reload를 사용하는 것을 고려하세요.
1단계: 제공된 URL(일반적으로 http://localhost:8000 또는 http://127.0.0.1:8000)을 브라우저에서 직접 엽니다.
2단계. UI의 왼쪽 상단 모서리에서 드롭다운에서 에이전트를 선택할 수 있습니다. "multi_tool_agent"를 선택합니다.
문제 해결
드롭다운 메뉴에 "multi_tool_agent"가 표시되지 않으면 에이전트 폴더의 상위 폴더(즉, multi_tool_agent의 상위 폴더)에서 adk web을 실행하고 있는지 확인하세요.
3단계. 이제 텍스트 상자를 사용하여 에이전트와 대화할 수 있습니다.
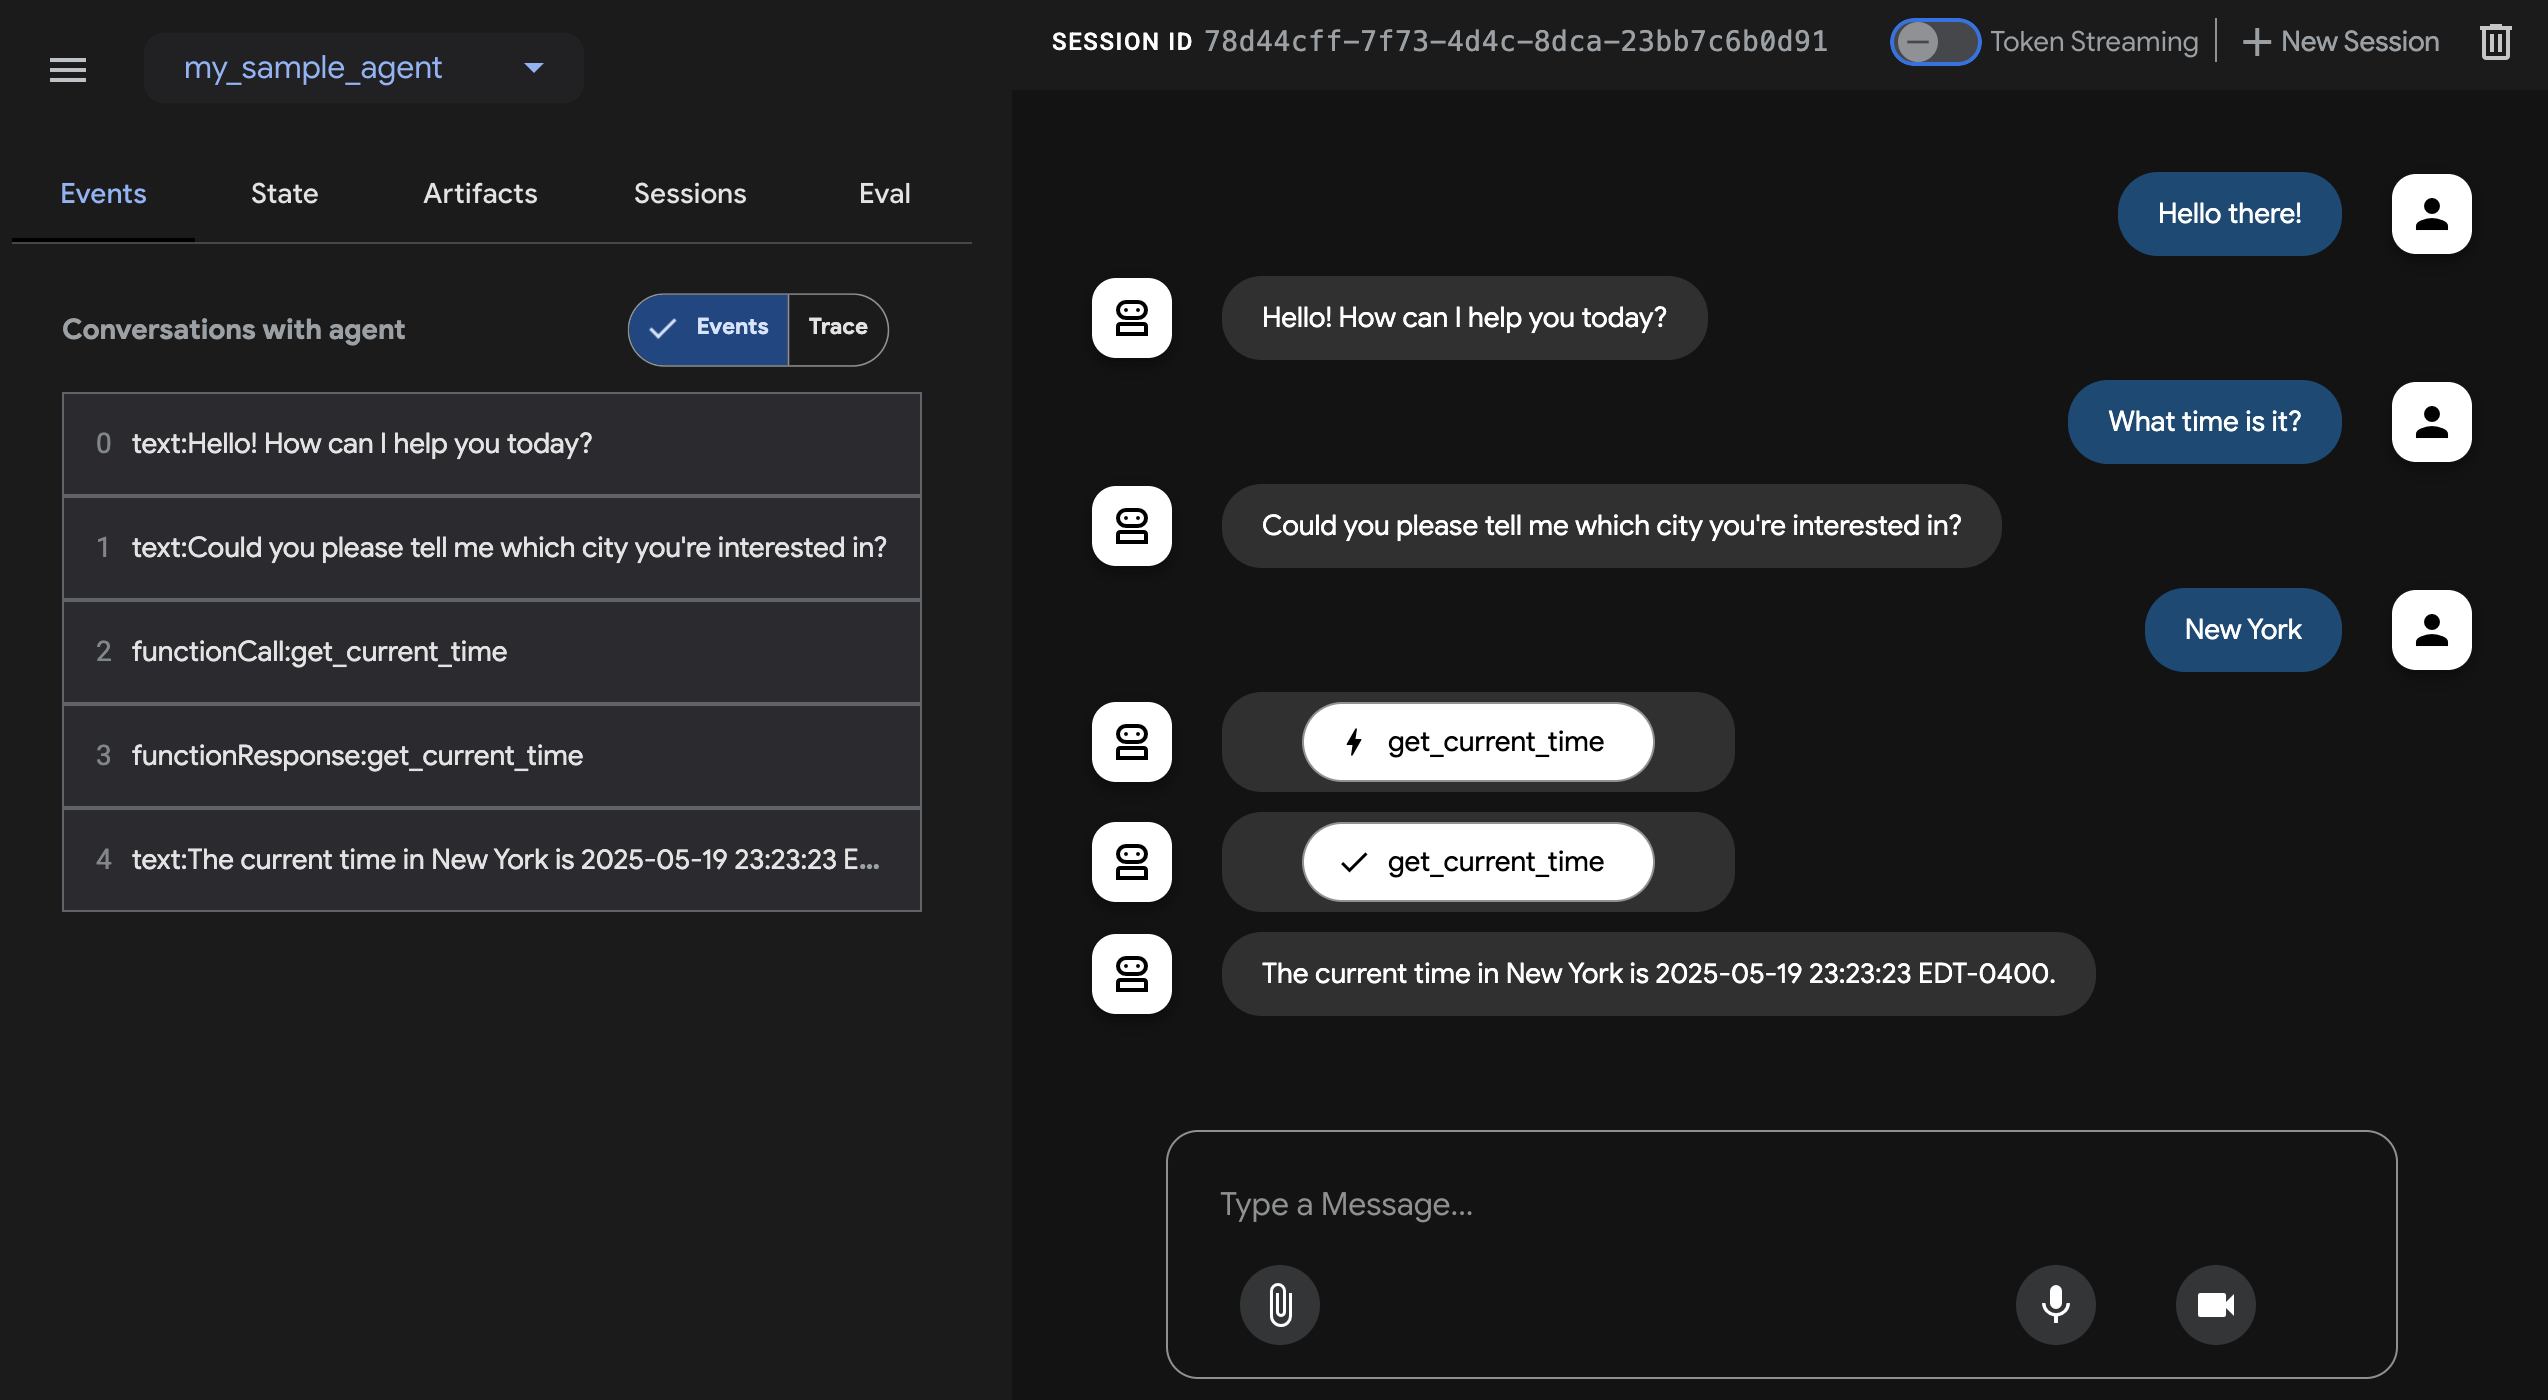
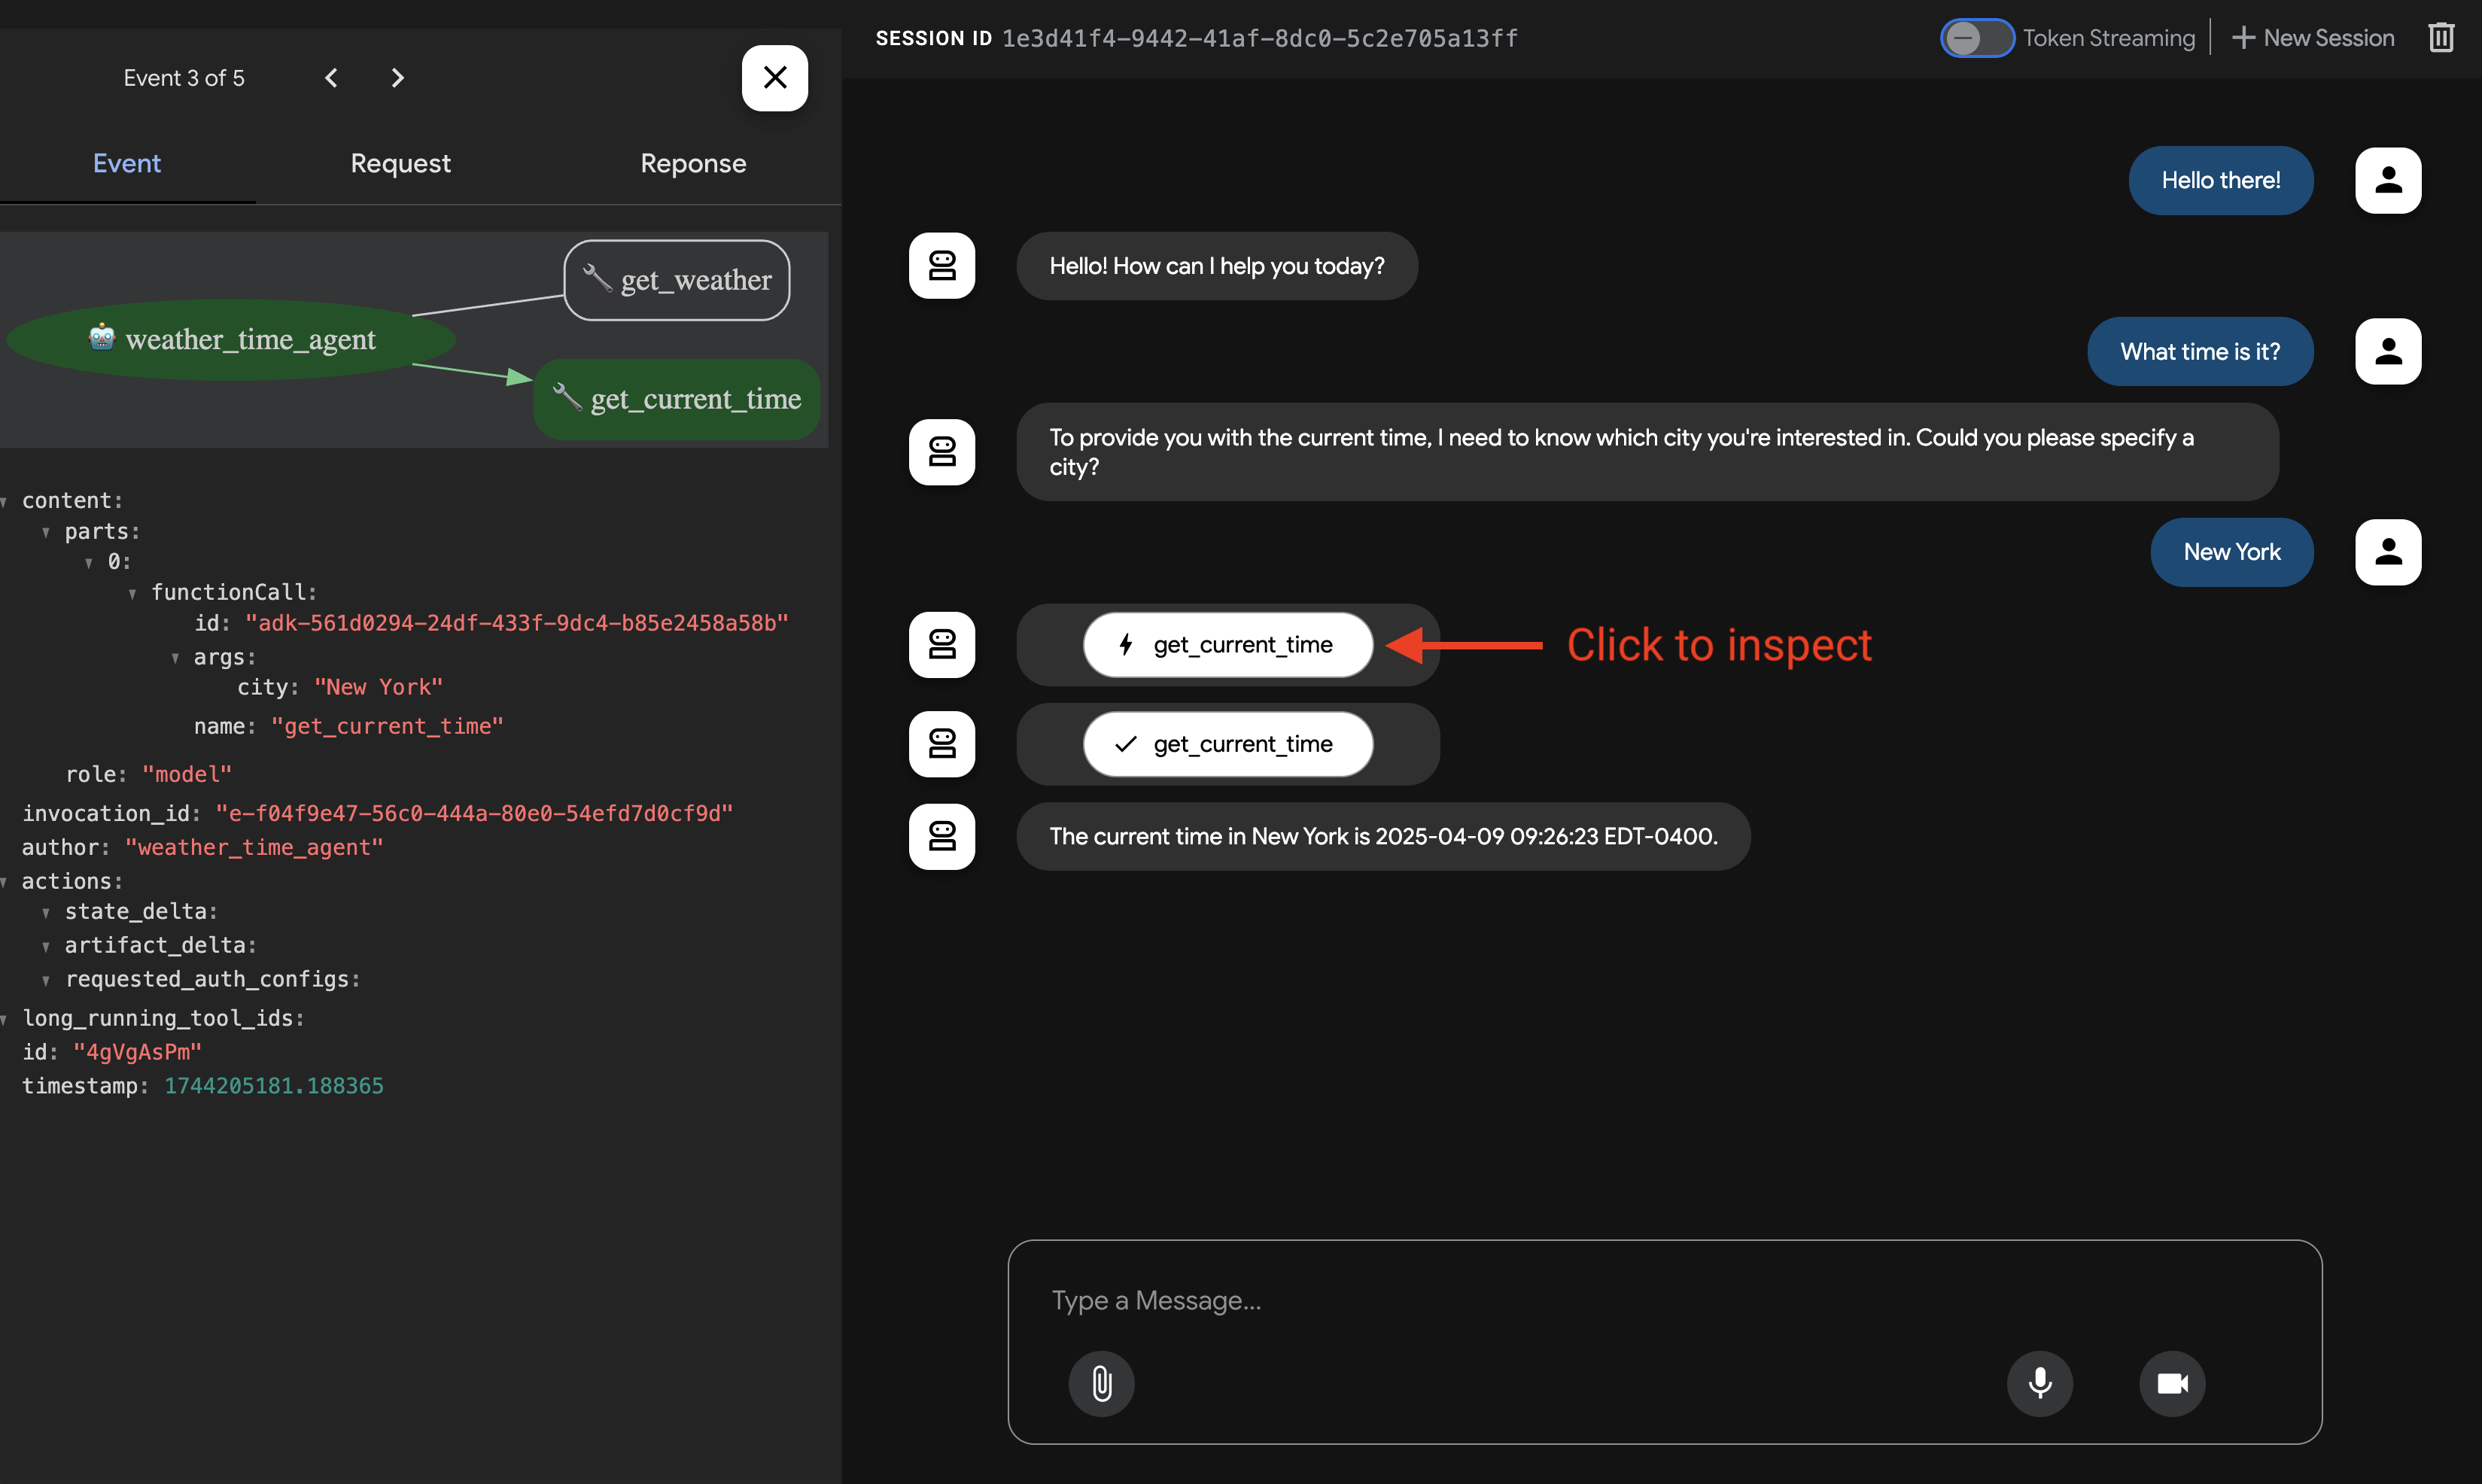
4단계. 왼쪽에 있는 이벤트 탭을 사용하여 작업을 클릭하여 개별 함수 호출, 응답 및 모델 응답을 검사할 수 있습니다.
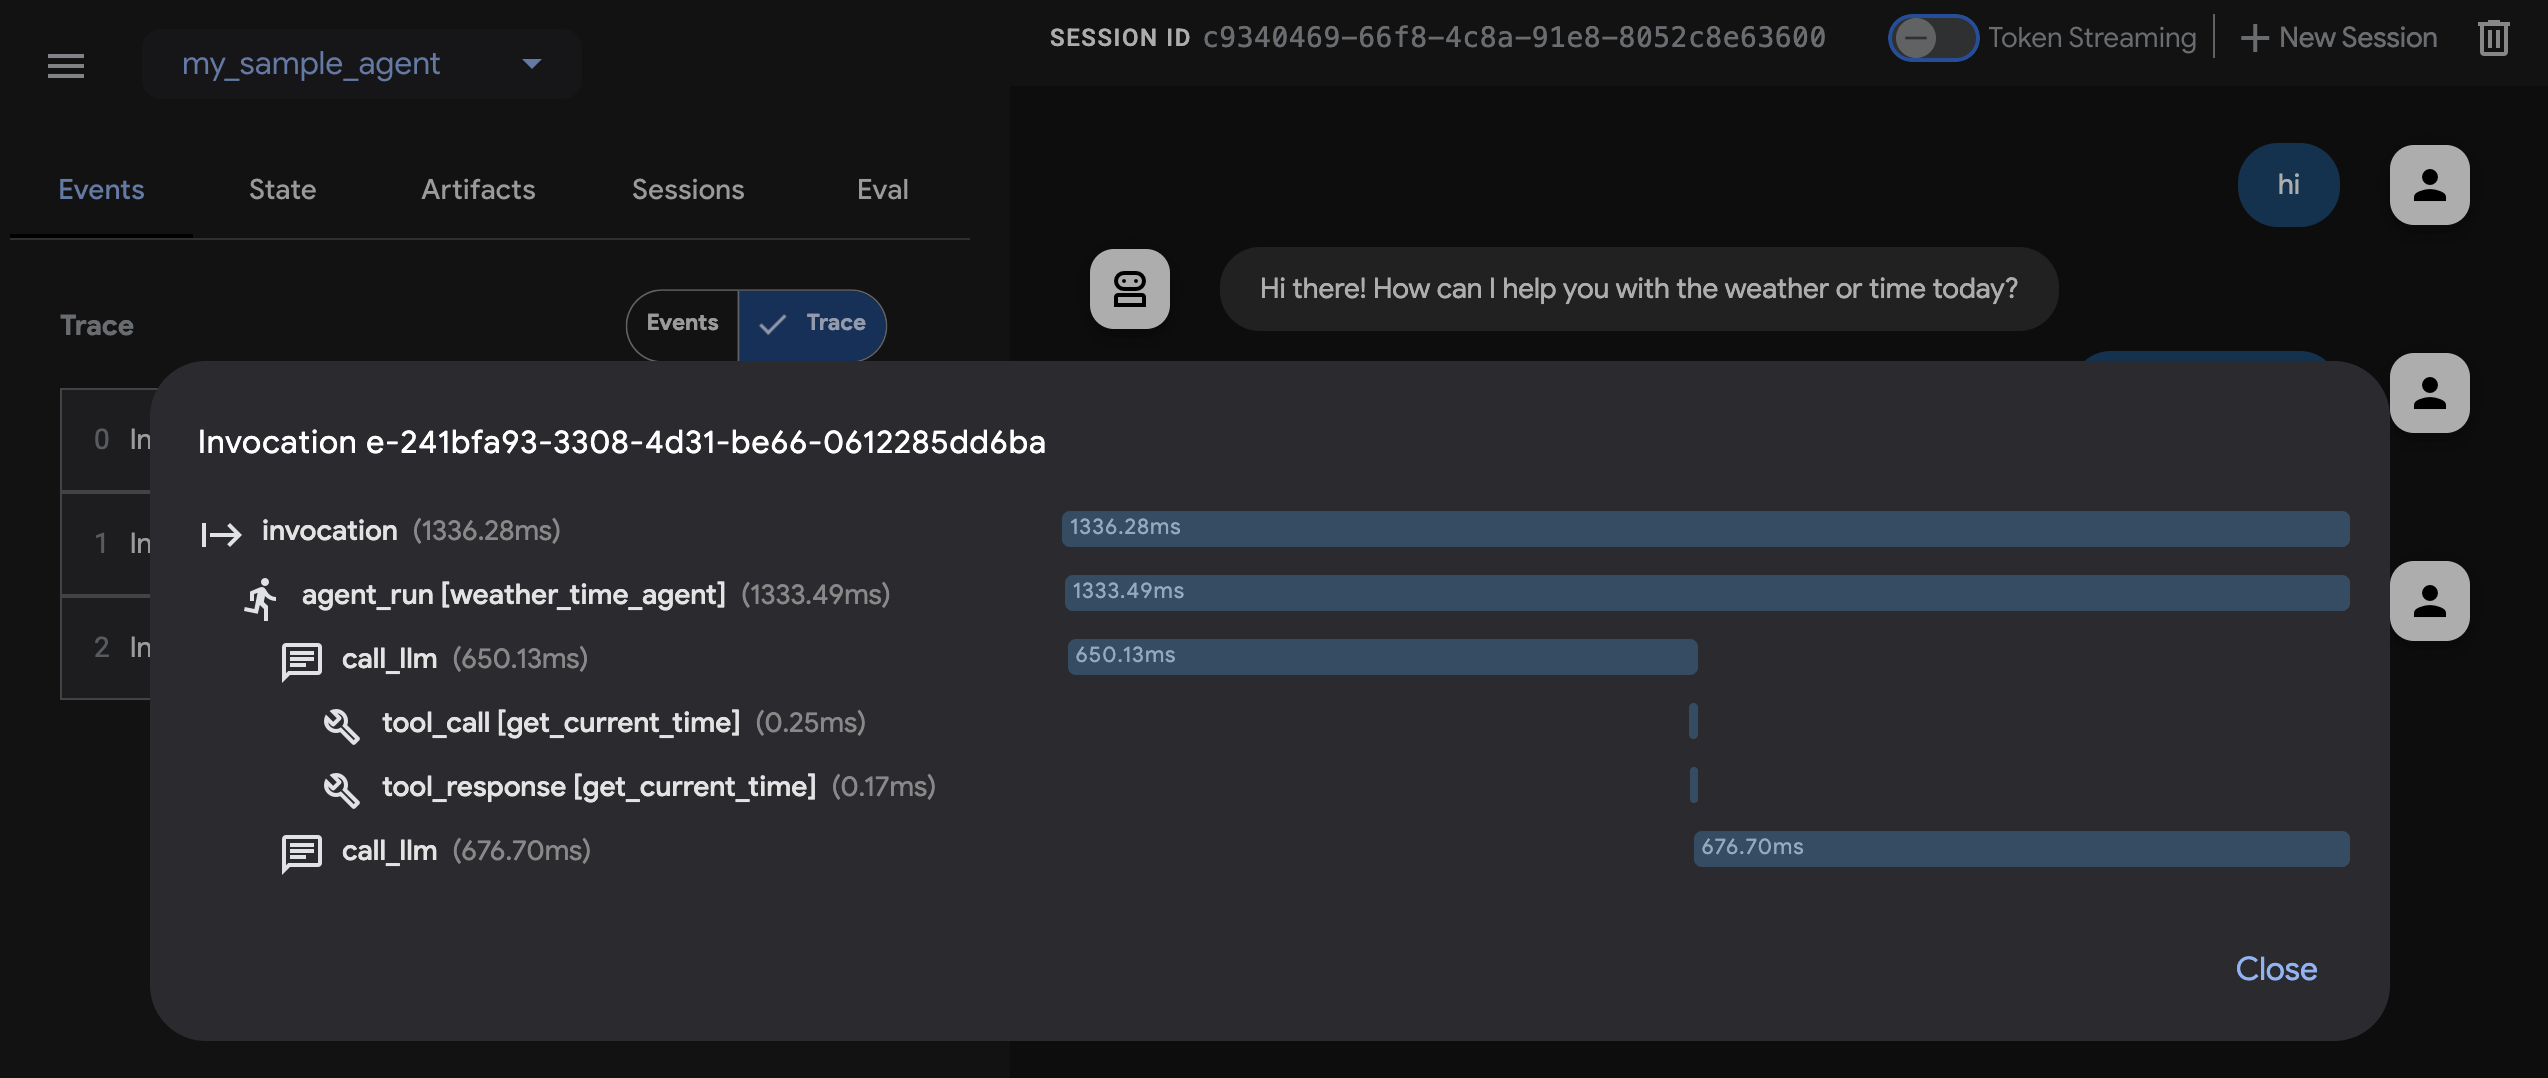
이벤트 탭에서 추적 버튼을 클릭하여 각 함수 호출의 지연 시간을 보여주는 각 이벤트에 대한 추적 로그를 볼 수도 있습니다.
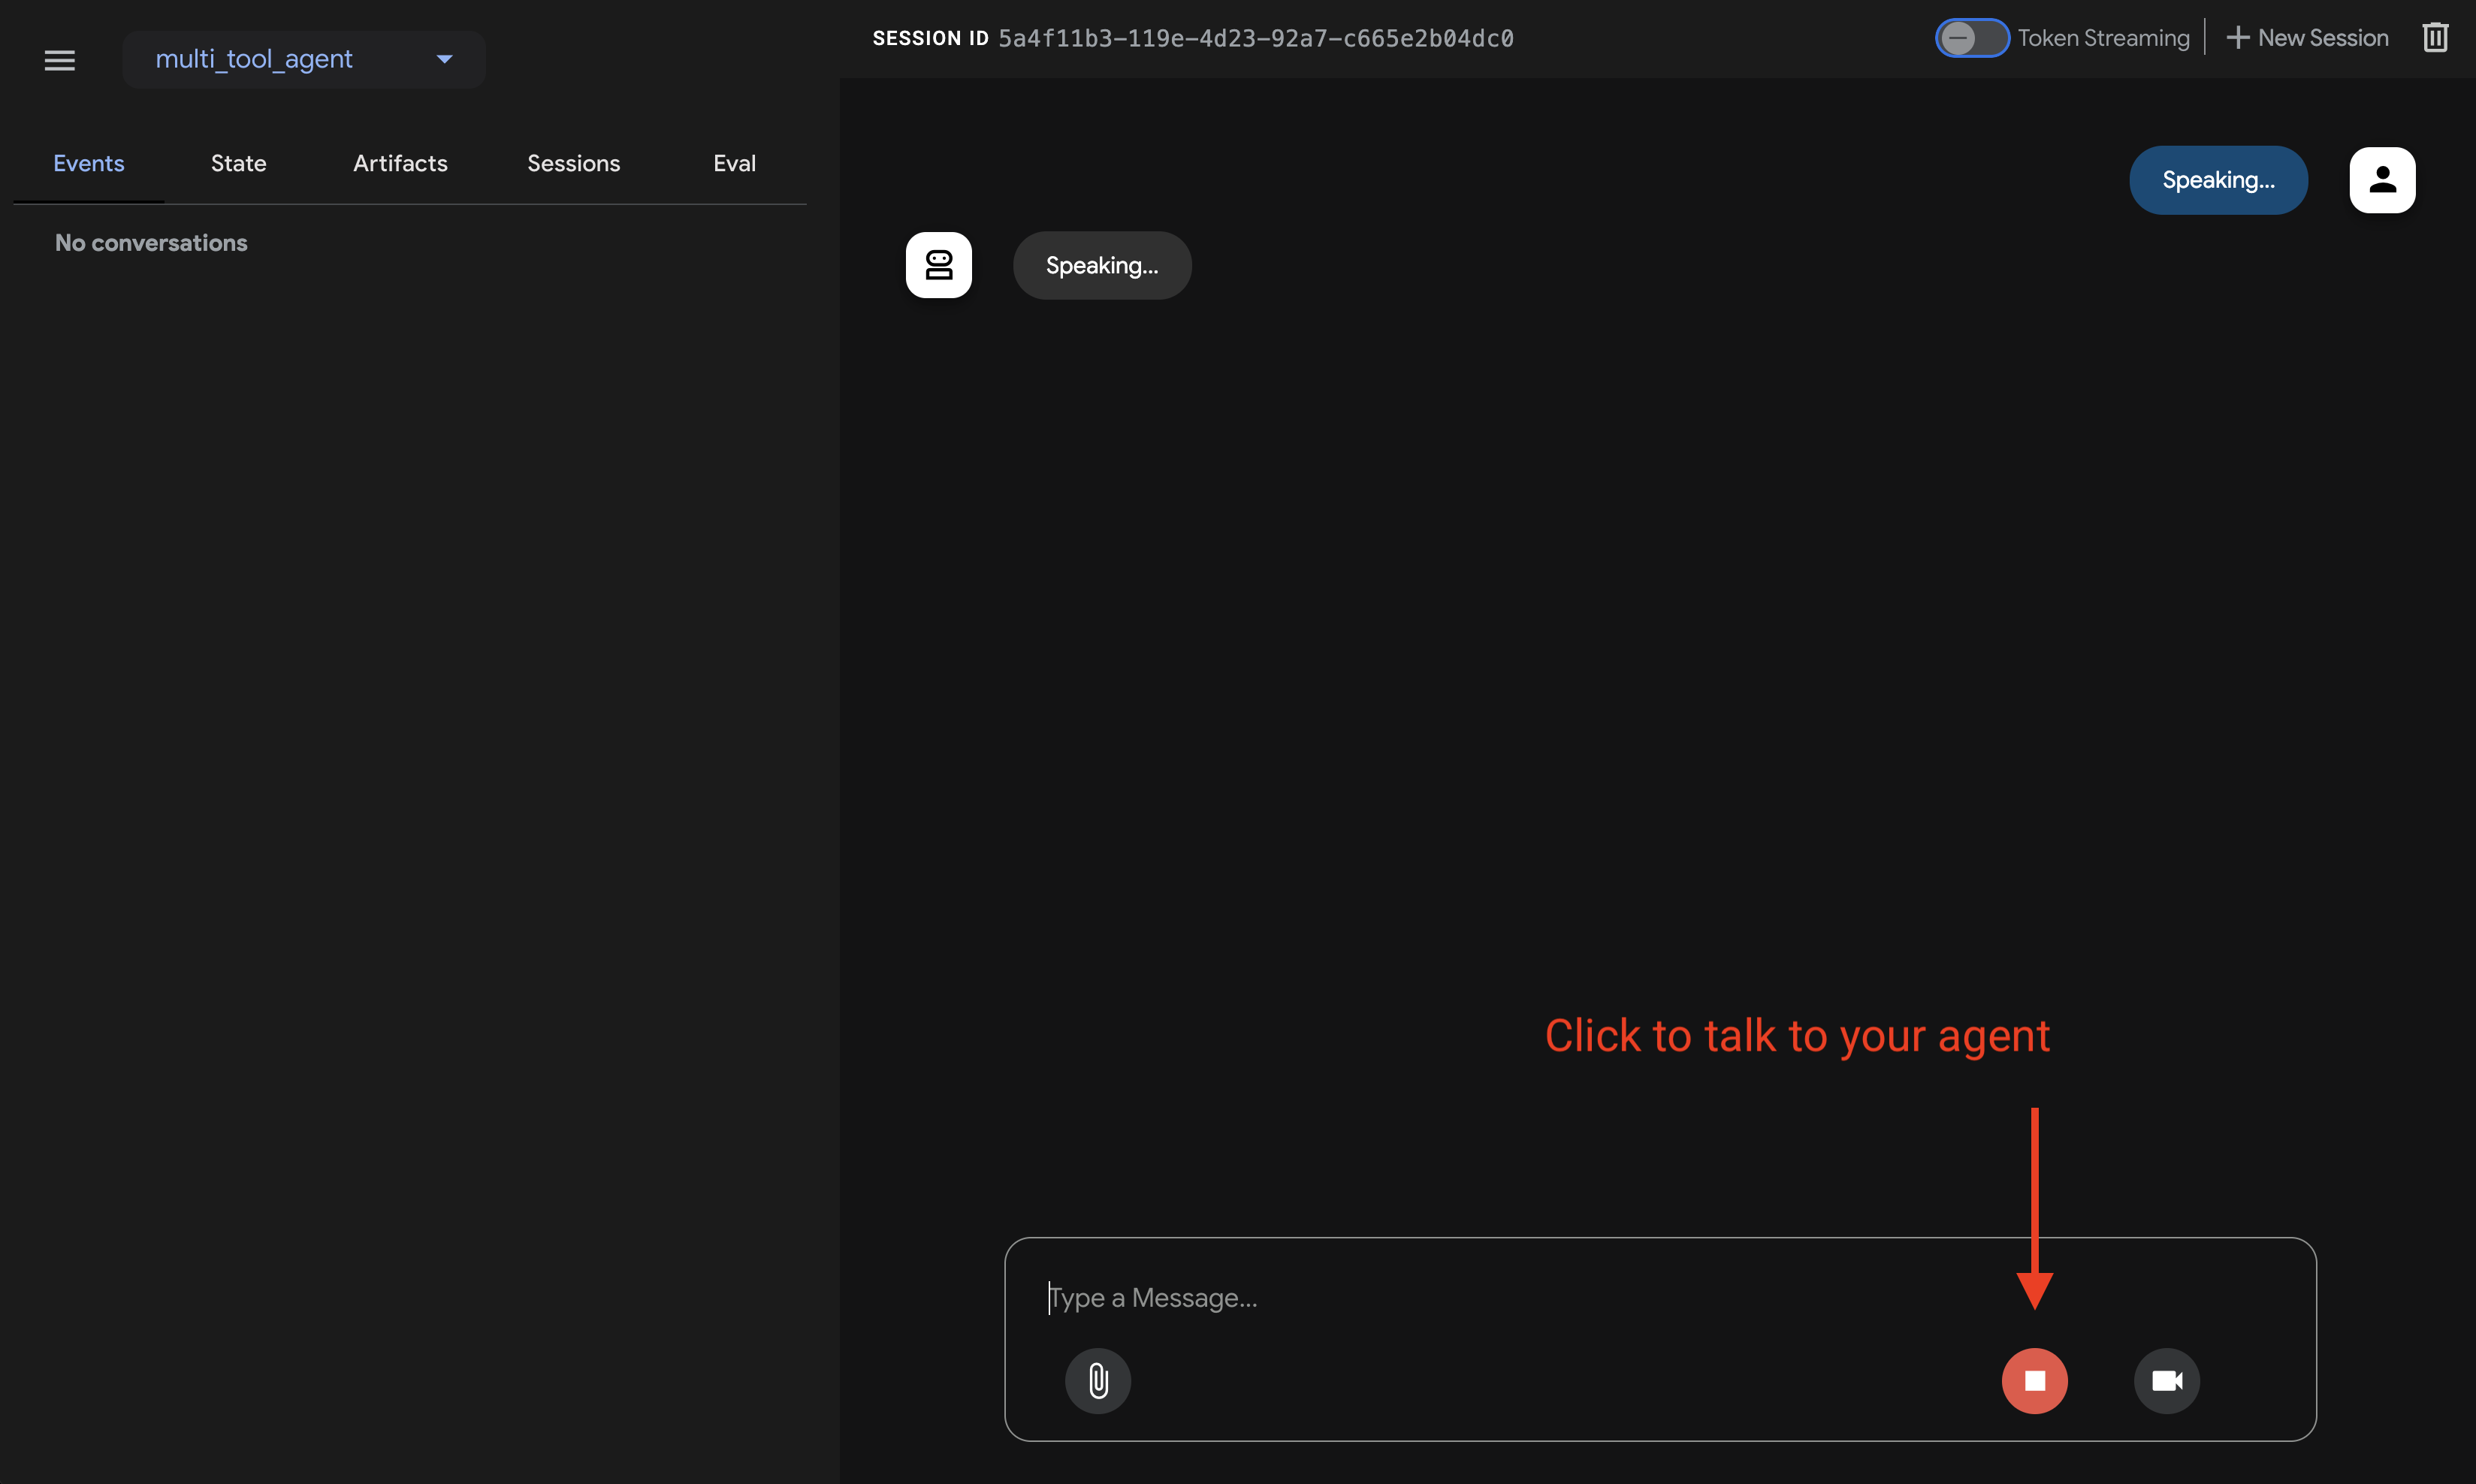
5단계. 마이크를 활성화하고 에이전트와 대화할 수도 있습니다.
음성/영상 스트리밍을 위한 모델 지원
ADK에서 음성/영상 스트리밍을 사용하려면 라이브 API를 지원하는 Gemini 모델을 사용해야 합니다. Gemini 라이브 API를 지원하는 모델 ID는 다음 문서에서 찾을 수 있습니다.
그런 다음 이전에 만든 agent.py 파일의 root_agent에서 model 문자열을 바꿀 수 있습니다(섹션으로 이동). 코드는 다음과 같아야 합니다.
adk api_server를 사용하면 단일 명령으로 로컬 FastAPI 서버를 만들 수 있으므로 에이전트를 배포하기 전에 로컬 cURL 요청을 테스트할 수 있습니다.

adk api_server를 테스트에 사용하는 방법을 배우려면 API 서버 사용에 대한 문서를 참고하세요.
터미널을 사용하여 에이전트 프로젝트 디렉터리로 이동합니다:
에이전트와 상호 작용하는 여러 가지 방법이 있습니다.
다음 명령을 실행하여 개발 UI를 시작합니다.
1단계: 제공된 URL(일반적으로 http://localhost:8000 또는 http://127.0.0.1:8000)을 브라우저에서 직접 엽니다.
2단계. UI 왼쪽 상단의 드롭다운에서 에이전트를 선택합니다. 에이전트는 파일명으로 표시되므로 "agent"를 선택해야 합니다.
문제 해결
드롭다운 메뉴에 "agent"가 보이지 않으면, agent.ts 파일이 있는 디렉터리에서 npx adk web을 실행하고 있는지 확인하세요.
3단계. 이제 텍스트 상자를 사용해 에이전트와 대화할 수 있습니다:
4단계. 왼쪽의 이벤트 탭을 사용하면, 액션을 클릭하여 개별 함수 호출, 응답, 모델 응답을 검사할 수 있습니다:
이벤트 탭에서는 추적 버튼을 클릭해 각 함수 호출의 지연 시간을 보여주는 이벤트별 추적 로그도 볼 수 있습니다:
npx adk api_server를 사용하면 단일 명령으로 로컬 Express.js 서버를 만들 수 있으므로, 에이전트를 배포하기 전에 로컬 cURL 요청을 테스트할 수 있습니다.
api_server를 테스트에 사용하는 방법은 테스트 문서를 참고하세요.
터미널을 사용하여 에이전트 프로젝트 디렉터리로 이동합니다:
에이전트와 상호 작용하는 여러 가지 방법이 있습니다.
다음 명령을 실행하여 개발 UI를 시작합니다. 활성화할 서브 런처를 지정해야 합니다(예: webui, api).
1단계: 제공된 URL(일반적으로 http://localhost:8080)을 브라우저에서 직접 엽니다.
2단계. UI의 왼쪽 상단 모서리에서 드롭다운에서 에이전트를 선택합니다. "weather_time_agent"를 선택합니다.
3단계. 이제 텍스트 상자를 사용하여 에이전트와 대화할 수 있습니다.
터미널을 사용하여 에이전트 프로젝트의 상위 디렉토리로 이동합니다(예: cd .. 사용).
project_folder/                <-- 이 디렉토리로 이동
├── pom.xml (또는 build.gradle)
├── src/
├── └── main/
│       └── java/
│           └── agents/
│               └── multitool/
│                   └── MultiToolAgent.java
└── test/
다음 명령을 터미널에서 실행하여 개발 UI를 시작합니다.
개발 UI 서버의 메인 클래스 이름을 변경하지 마십시오.
mvn exec:java \
    -Dexec.mainClass="com.google.adk.web.AdkWebServer" \
    -Dexec.args="--adk.agents.source-dir=src/main/java" \
    -Dexec.classpathScope="compile"
1단계: 제공된 URL(일반적으로 http://localhost:8080 또는 http://127.0.0.1:8080)을 브라우저에서 직접 엽니다.
2단계. UI의 왼쪽 상단 모서리에서 드롭다운에서 에이전트를 선택할 수 있습니다. "multi_tool_agent"를 선택합니다.
문제 해결
드롭다운 메뉴에 "multi_tool_agent"가 표시되지 않으면 Java 소스 코드가 있는 위치(일반적으로 src/main/java)에서 mvn 명령을 실행하고 있는지 확인하세요.
3단계. 이제 텍스트 상자를 사용하여 에이전트와 대화할 수 있습니다.
4단계. 개별 함수 호출, 응답 및 모델 응답을 클릭하여 검사할 수도 있습니다.
Maven을 사용하여 다음 명령으로 Java 클래스의 main() 메서드를 실행합니다.
Gradle을 사용하는 경우 build.gradle 또는 build.gradle.kts 빌드 파일의 plugins 섹션에 다음 Java 플러그인이 있어야 합니다.
그런 다음 빌드 파일의 다른 곳, 최상위 수준에서 에이전트의 main() 메서드를 실행하는 새 작업을 생성합니다.
tasks.register('runAgent', JavaExec) {
    classpath = sourceSets.main.runtimeClasspath
    mainClass = 'agents.multitool.MultiToolAgent'
}
마지막으로 명령줄에서 다음 명령을 실행합니다.
터미널에서 에이전트 프로젝트 디렉터리로 이동합니다.
project_folder/                <-- 이 디렉터리로 이동
├── build.gradle.kts
├── src/
├── └── main/
│       └── kotlin/
│           └── agents/
│               └── multitool/
│                   └── MultiToolAgent.kt
에이전트 실행
Gradle을 사용하여 Kotlin 클래스의 main() 메서드를 실행할 수 있습니다.
IntelliJ IDEA를 사용하는 경우 main() 함수 옆의 녹색 실행 화살표를 클릭해도 됩니다.
📝 시도할 예시 프롬프트
- 뉴욕의 날씨는 어떻습니까?
- 뉴욕의 시간은 몇 시입니까?
- 파리의 날씨는 어떻습니까?
- 파리의 시간은 몇 시입니까?
🎉 축하합니다!
ADK를 사용하여 첫 번째 에이전트를 성공적으로 만들고 상호 작용했습니다!