Java로 실시간 스트리밍 에이전트 구축하기
ADK Streaming을 사용하여 지연 시간이 짧은 양방향 음성 대화를 나누는 Java 에이전트를 구축합니다.
Java와 Maven을 설정하고, 프로젝트 종속성을 정의한 뒤 ScienceTeacherAgent를 구축합니다. 먼저 Dev UI에서 텍스트 스트리밍으로 테스트한 다음, 라이브 오디오를 활성화하여 대화해 봅니다.
첫 번째 에이전트 만들기
기본 요건
-
이 시작 가이드에서는 Java로 프로그래밍합니다. 컴퓨터에 Java가 설치되어 있는지 확인하세요. Java 17 이상을 사용하는 것이 좋으며, java -version을 입력하여 확인할 수 있습니다.
-
Java용 Maven 빌드 도구가 필요하므로 진행하기 전에 Maven을 설치하세요(Cloud Top과 Cloud Shell에는 이미 설치되어 있지만, 로컬 개발 환경에는 없을 수 있습니다).
프로젝트 구조 준비
ADK Java를 시작하기 위해 다음 디렉토리 구조를 가진 Maven 프로젝트를 생성해 보겠습니다.
설치(Installation) 페이지의 지침에 따라 pom.xml을 추가하여 ADK 패키지를 사용할 수 있도록 설정하세요.
Note
프로젝트의 루트 디렉토리 이름은 원하는 대로 정해도 됩니다 (꼭 adk-agents일 필요는 없습니다).
컴파일 실행
Maven이 이 빌드를 문제없이 처리하는지 확인하기 위해 컴파일(mvn compile 명령어)을 실행해 보겠습니다.
$ mvn compile
[INFO] Scanning for projects...
[INFO]
[INFO] --------------------< adk-agents:adk-agents >--------------------
[INFO] Building adk-agents 1.0-SNAPSHOT
[INFO]   from pom.xml
[INFO] --------------------------------[ jar ]---------------------------------
[INFO]
[INFO] --- resources:3.3.1:resources (default-resources) @ adk-demo ---
[INFO] skip non existing resourceDirectory /home/user/adk-demo/src/main/resources
[INFO]
[INFO] --- compiler:3.13.0:compile (default-compile) @ adk-demo ---
[INFO] Nothing to compile - all classes are up to date.
[INFO] ------------------------------------------------------------------------
[INFO] BUILD SUCCESS
[INFO] ------------------------------------------------------------------------
[INFO] Total time:  1.347 s
[INFO] Finished at: 2025-05-06T15:38:08Z
[INFO] ------------------------------------------------------------------------
프로젝트가 컴파일을 위한 설정이 제대로 된 것 같습니다!
에이전트 생성
src/main/java/agents/ 디렉토리 아래에 다음 내용으로 ScienceTeacherAgent.java 파일을 생성합니다.
package samples.liveaudio;

import com.google.adk.agents.BaseAgent;
import com.google.adk.agents.LlmAgent;

/** 과학 선생님 에이전트. */
public class ScienceTeacherAgent {

  // Dev UI가 에이전트를 동적으로 로드하기 위해 기대하는 필드
  // (에이전트는 선언 시점에 초기화되어야 합니다)
  public static final BaseAgent ROOT_AGENT = initAgent();

  // Live API를 지원하는 최신 모델 ID를 아래 문서에서 확인해 입력하세요.
  // https://adk.dev/get-started/streaming/quickstart-streaming/#supported-models
  public static BaseAgent initAgent() {
    return LlmAgent.builder()
        .name("science-app")
        .description("Science teacher agent")
        .model("...") // Live API용 최신 모델 ID를 입력하세요.
        .instruction("""
            You are a helpful science teacher that explains
            science concepts to kids and teenagers.
            """)
        .build();
  }
}
나중에 이 에이전트를 실행하기 위해 Dev UI를 사용할 것입니다. 도구가 에이전트를 자동으로 인식하려면 해당 Java 클래스가 다음 두 가지 규칙을 준수해야 합니다.
- 에이전트는 BaseAgent 타입의 ROOT_AGENT라는 전역 public static 변수에 저장되어야 하며, 선언 시점에 초기화되어야 합니다.
- 동적 컴파일 클래스로더에 의해 클래스 초기화 중에 로드될 수 있도록, 에이전트 정의는 static 메서드여야 합니다.
Dev UI로 에이전트 실행하기
Dev UI는 에이전트용 UI 애플리케이션을 직접 빌드하지 않고도 개발 목적으로 에이전트를 빠르게 실행하고 테스트할 수 있는 웹 서버입니다.
환경 변수 정의
서버를 실행하려면 두 가지 환경 변수를 내보내야(export) 합니다.
- AI Studio에서 발급받을 수 있는 Gemini 키
- 이번에는 Vertex AI를 사용하지 않음을 명시하는 변수
Dev UI 실행
터미널에서 다음 명령어를 실행하여 Dev UI를 시작합니다.
mvn exec:java \
    -Dexec.mainClass="com.google.adk.web.AdkWebServer" \
    -Dexec.args="--adk.agents.source-dir=." \
    -Dexec.classpathScope="compile"
1단계: 브라우저에서 제공된 URL(일반적으로 http://localhost:8080 또는 http://127.0.0.1:8080)을 엽니다.
2단계: UI의 왼쪽 상단 모서리에 있는 드롭다운에서 에이전트를 선택할 수 있습니다. "science-app"을 선택하세요.
문제 해결(Troubleshooting)
드롭다운 메뉴에 "science-app"이 보이지 않는다면, mvn 명령어를 maven 프로젝트의 루트 디렉토리에서 실행하고 있는지 확인하세요.
주의: ADK Web은 개발용으로만 사용하세요
ADK Web은 프로덕션 배포에서 사용하도록 설계되지 않았습니다. ADK Web은 개발 및 디버깅 용도로만 사용하세요.
음성 및 비디오로 Dev UI 체험하기
브라우저를 사용하여 다음 주소로 이동합니다: http://127.0.0.1:8080/
다음과 같은 인터페이스가 표시될 것입니다.
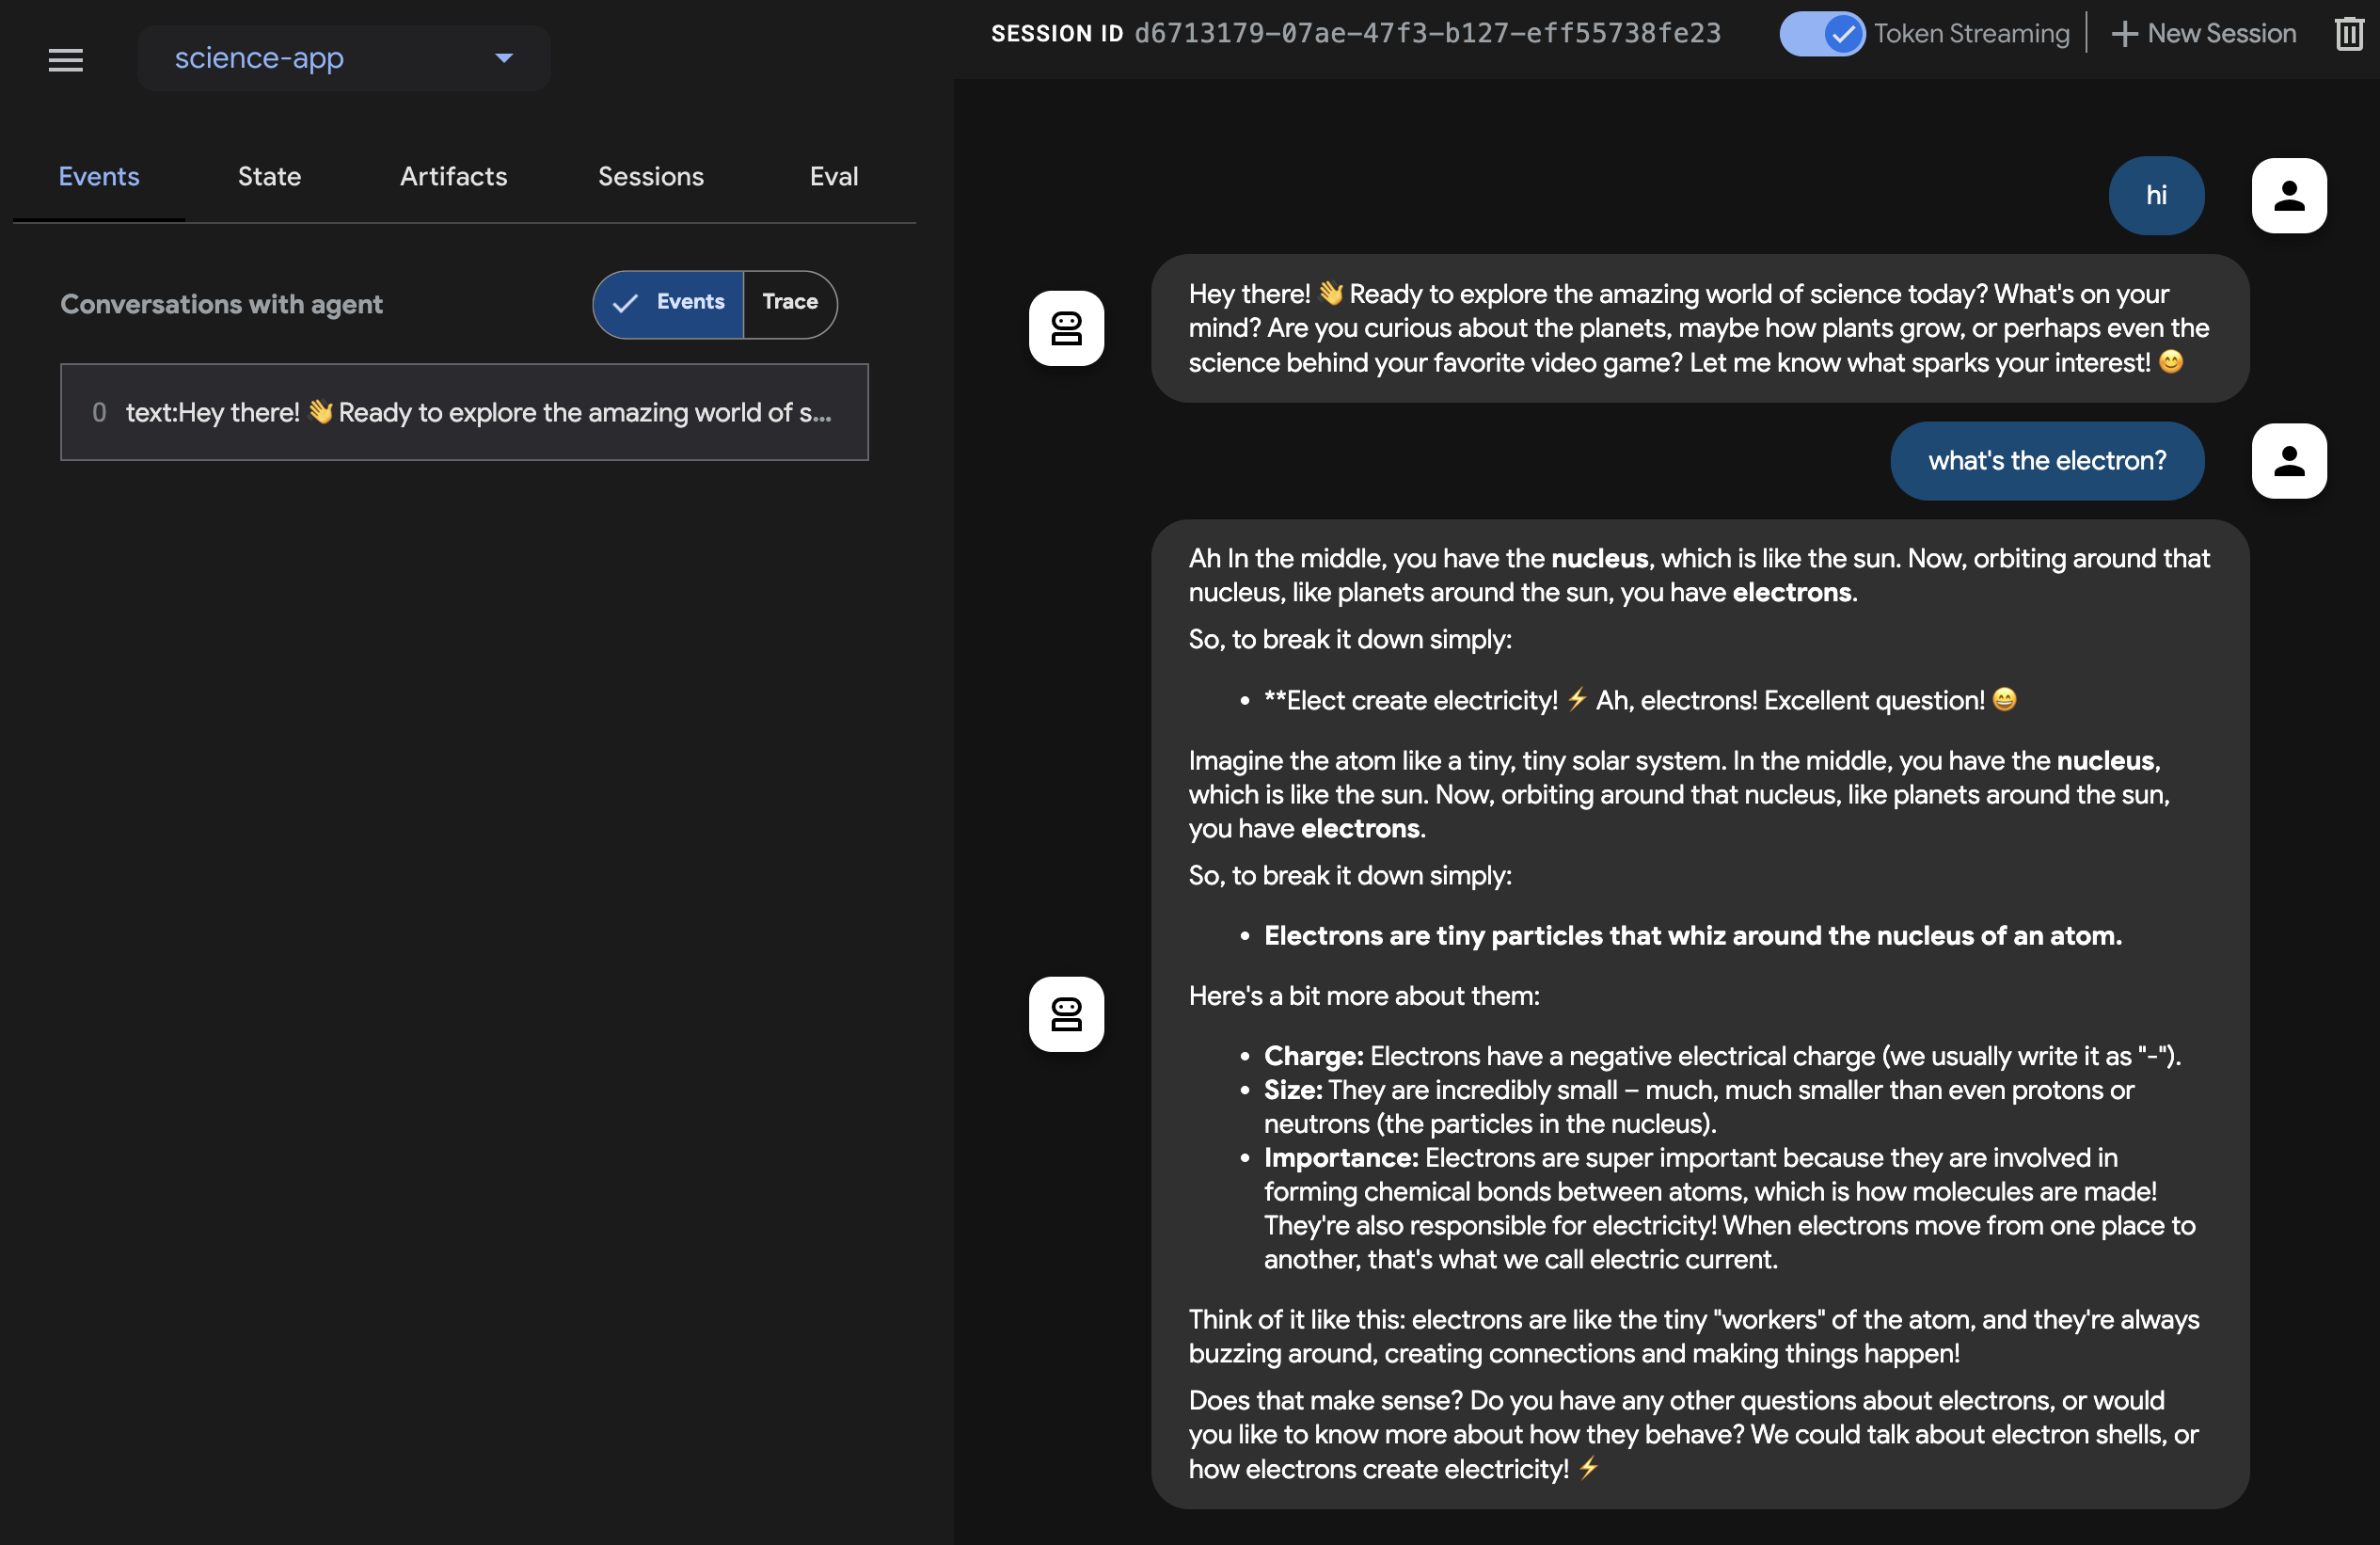
마이크 버튼을 클릭해 음성 입력을 활성화하고 전자(electron)가 뭐야? 같은 질문을 음성으로 해보세요. 실시간으로 음성 답변을 들을 수 있습니다.
비디오를 사용하려면 브라우저를 새로고침하고 카메라 버튼을 클릭해 비디오 입력을 활성화한 뒤, "무엇이 보이나요?"와 같은 질문을 해보세요. 에이전트는 비디오 입력에서 보이는 내용을 답변합니다.
유의 사항
- native-audio 모델에서는 텍스트 채팅을 사용할 수 없습니다.
adk web에서 텍스트 메시지를 입력하면 오류가 발생할 수 있습니다.
도구 중지
콘솔에서 Ctrl-C를 눌러 도구를 중지합니다.
커스텀 라이브 오디오 앱으로 에이전트 실행하기
이제 에이전트와 커스텀 라이브 오디오 애플리케이션을 사용하여 오디오 스트리밍을 시도해 보겠습니다.
라이브 오디오용 Maven pom.xml 빌드 파일
기존 pom.xml을 다음 내용으로 교체하세요.
<?xml version="1.0" encoding="UTF-8"?>
<project xmlns="http://maven.apache.org/POM/4.0.0"
  xmlns:xsi="http://www.w3.org/2001/XMLSchema-instance"
  xsi:schemaLocation="http://maven.apache.org/POM/4.0.0 http://maven.apache.org/xsd/maven-4.0.0.xsd">
  <modelVersion>4.0.0</modelVersion>

  <groupId>com.google.adk.samples</groupId>
  <artifactId>google-adk-sample-live-audio</artifactId>
  <version>0.1.0</version>
  <name>Google ADK - Sample - Live Audio</name>
  <description>
    ADK를 사용한 라이브 오디오 대화를 보여주는 샘플 애플리케이션으로,
    samples.liveaudio.LiveAudioRun을 통해 실행 가능합니다.
  </description>
  <packaging>jar</packaging>

  <properties>
    <project.build.sourceEncoding>UTF-8</project.build.sourceEncoding>
    <java.version>17</java.version>
    <auto-value.version>1.11.0</auto-value.version>
    <!-- exec-maven-plugin용 메인 클래스 -->
    <exec.mainClass>samples.liveaudio.LiveAudioRun</exec.mainClass>
    <google-adk.version>1.6.0</google-adk.version>
  </properties>

  <dependencyManagement>
    <dependencies>
      <dependency>
        <groupId>com.google.cloud</groupId>
        <artifactId>libraries-bom</artifactId>
        <version>26.53.0</version>
        <type>pom</type>
        <scope>import</scope>
      </dependency>
    </dependencies>
  </dependencyManagement>

  <dependencies>
    <dependency>
      <groupId>com.google.adk</groupId>
      <artifactId>google-adk</artifactId>
      <version>${google-adk.version}</version>
    </dependency>
    <dependency>
      <groupId>commons-logging</groupId>
      <artifactId>commons-logging</artifactId>
      <version>1.2</version> <!-- 상위 POM에 정의된 경우 속성을 사용하세요 -->
    </dependency>
  </dependencies>

  <build>
    <plugins>
      <plugin>
        <groupId>org.apache.maven.plugins</groupId>
        <artifactId>maven-compiler-plugin</artifactId>
        <version>3.13.0</version>
        <configuration>
          <source>${java.version}</source>
          <target>${java.version}</target>
          <parameters>true</parameters>
          <annotationProcessorPaths>
            <path>
              <groupId>com.google.auto.value</groupId>
              <artifactId>auto-value</artifactId>
              <version>${auto-value.version}</version>
            </path>
          </annotationProcessorPaths>
        </configuration>
      </plugin>
      <plugin>
        <groupId>org.codehaus.mojo</groupId>
        <artifactId>build-helper-maven-plugin</artifactId>
        <version>3.6.0</version>
        <executions>
          <execution>
            <id>add-source</id>
            <phase>generate-sources</phase>
            <goals>
              <goal>add-source</goal>
            </goals>
            <configuration>
              <sources>
                <source>.</source>
              </sources>
            </configuration>
          </execution>
        </executions>
      </plugin>
      <plugin>
        <groupId>org.codehaus.mojo</groupId>
        <artifactId>exec-maven-plugin</artifactId>
        <version>3.2.0</version>
        <configuration>
          <mainClass>${exec.mainClass}</mainClass>
          <classpathScope>runtime</classpathScope>
        </configuration>
      </plugin>
    </plugins>
  </build>
</project>
라이브 오디오 실행(Run) 도구 생성
src/main/java/ 디렉토리 아래에 다음 내용으로 LiveAudioRun.java 파일을 생성합니다. 이 도구는 라이브 오디오 입력 및 출력을 사용하여 에이전트를 실행합니다.
package samples.liveaudio;

import com.google.adk.agents.LiveRequestQueue;
import com.google.adk.agents.RunConfig;
import com.google.adk.events.Event;
import com.google.adk.runner.Runner;
import com.google.adk.sessions.InMemorySessionService;
import com.google.common.collect.ImmutableList;
import com.google.genai.types.Blob;
import com.google.genai.types.Modality;
import com.google.genai.types.PrebuiltVoiceConfig;
import com.google.genai.types.Content;
import com.google.genai.types.Part;
import com.google.genai.types.SpeechConfig;
import com.google.genai.types.VoiceConfig;
import io.reactivex.rxjava3.core.Flowable;
import java.io.ByteArrayOutputStream;
import java.io.InputStream;
import java.net.URL;
import javax.sound.sampled.AudioFormat;
import javax.sound.sampled.AudioInputStream;
import javax.sound.sampled.AudioSystem;
import javax.sound.sampled.DataLine;
import javax.sound.sampled.LineUnavailableException;
import javax.sound.sampled.Mixer;
import javax.sound.sampled.SourceDataLine;
import javax.sound.sampled.TargetDataLine;
import java.util.UUID;
import java.util.concurrent.ExecutorService;
import java.util.concurrent.ConcurrentHashMap;
import java.util.concurrent.ConcurrentMap;
import java.util.concurrent.Executors;
import java.util.concurrent.Future;
import java.util.concurrent.TimeUnit;
import java.util.concurrent.atomic.AtomicBoolean;
import agents.ScienceTeacherAgent;

/** 음성 대화를 위해 {@link LiveAudioAgent} 실행을 시연하는 메인 클래스입니다. */
public final class LiveAudioRun {
  private final String userId;
  private final String sessionId;
  private final Runner runner;

  private static final javax.sound.sampled.AudioFormat MIC_AUDIO_FORMAT =
      new javax.sound.sampled.AudioFormat(16000.0f, 16, 1, true, false);

  private static final javax.sound.sampled.AudioFormat SPEAKER_AUDIO_FORMAT =
      new javax.sound.sampled.AudioFormat(24000.0f, 16, 1, true, false);

  private static final int BUFFER_SIZE = 4096;

  public LiveAudioRun() {
    this.userId = "test_user";
    String appName = "LiveAudioApp";
    this.sessionId = UUID.randomUUID().toString();

    InMemorySessionService sessionService = new InMemorySessionService();
    this.runner = new Runner(ScienceTeacherAgent.ROOT_AGENT, appName, null, sessionService);

    ConcurrentMap<String, Object> initialState = new ConcurrentHashMap<>();
    var unused =
        sessionService.createSession(appName, userId, initialState, sessionId).blockingGet();
  }

  private void runConversation() throws Exception {
    System.out.println("Initializing microphone input and speaker output...");

    RunConfig runConfig =
        RunConfig.builder()
            .setStreamingMode(RunConfig.StreamingMode.BIDI)
            .setResponseModalities(ImmutableList.of(new Modality("AUDIO")))
            .setSpeechConfig(
                SpeechConfig.builder()
                    .voiceConfig(
                        VoiceConfig.builder()
                            .prebuiltVoiceConfig(
                                PrebuiltVoiceConfig.builder().voiceName("Aoede").build())
                            .build())
                    .languageCode("en-US")
                    .build())
            .build();

    LiveRequestQueue liveRequestQueue = new LiveRequestQueue();

    Flowable<Event> eventStream =
        this.runner.runLive(
            runner.sessionService().createSession(userId, sessionId).blockingGet(),
            liveRequestQueue,
            runConfig);

    AtomicBoolean isRunning = new AtomicBoolean(true);
    AtomicBoolean conversationEnded = new AtomicBoolean(false);
    ExecutorService executorService = Executors.newFixedThreadPool(2);

    // 마이크 입력을 캡처하는 작업
    Future<?> microphoneTask =
        executorService.submit(() -> captureAndSendMicrophoneAudio(liveRequestQueue, isRunning));

    // 에이전트 응답을 처리하고 오디오를 재생하는 작업
    Future<?> outputTask =
        executorService.submit(
            () -> {
              try {
                processAudioOutput(eventStream, isRunning, conversationEnded);
              } catch (Exception e) {
                System.err.println("Error processing audio output: " + e.getMessage());
                e.printStackTrace();
                isRunning.set(false);
              }
            });

    // 사용자가 대화를 중지하기 위해 Enter를 누를 때까지 대기
    System.out.println("Conversation started. Press Enter to stop...");
    System.in.read();

    System.out.println("Ending conversation...");
    isRunning.set(false);

    try {
      // 진행 중인 처리가 완료될 때까지 잠시 대기
      microphoneTask.get(2, TimeUnit.SECONDS);
      outputTask.get(2, TimeUnit.SECONDS);
    } catch (Exception e) {
      System.out.println("Stopping tasks...");
    }

    liveRequestQueue.close();
    executorService.shutdownNow();
    System.out.println("Conversation ended.");
  }

  private void captureAndSendMicrophoneAudio(
      LiveRequestQueue liveRequestQueue, AtomicBoolean isRunning) {
    TargetDataLine micLine = null;
    try {
      DataLine.Info info = new DataLine.Info(TargetDataLine.class, MIC_AUDIO_FORMAT);
      if (!AudioSystem.isLineSupported(info)) {
        System.err.println("Microphone line not supported!");
        return;
      }

      micLine = (TargetDataLine) AudioSystem.getLine(info);
      micLine.open(MIC_AUDIO_FORMAT);
      micLine.start();

      System.out.println("Microphone initialized. Start speaking...");

      byte[] buffer = new byte[BUFFER_SIZE];
      int bytesRead;

      while (isRunning.get()) {
        bytesRead = micLine.read(buffer, 0, buffer.length);

        if (bytesRead > 0) {
          byte[] audioChunk = new byte[bytesRead];
          System.arraycopy(buffer, 0, audioChunk, 0, bytesRead);

          Blob audioBlob = Blob.builder().data(audioChunk).mimeType("audio/pcm").build();

          liveRequestQueue.realtime(audioBlob);
        }
      }
    } catch (LineUnavailableException e) {
      System.err.println("Error accessing microphone: " + e.getMessage());
      e.printStackTrace();
    } finally {
      if (micLine != null) {
        micLine.stop();
        micLine.close();
      }
    }
  }

  private void processAudioOutput(
      Flowable<Event> eventStream, AtomicBoolean isRunning, AtomicBoolean conversationEnded) {
    SourceDataLine speakerLine = null;
    try {
      DataLine.Info info = new DataLine.Info(SourceDataLine.class, SPEAKER_AUDIO_FORMAT);
      if (!AudioSystem.isLineSupported(info)) {
        System.err.println("Speaker line not supported!");
        return;
      }

      final SourceDataLine finalSpeakerLine = (SourceDataLine) AudioSystem.getLine(info);
      finalSpeakerLine.open(SPEAKER_AUDIO_FORMAT);
      finalSpeakerLine.start();

      System.out.println("Speaker initialized.");

      for (Event event : eventStream.blockingIterable()) {
        if (!isRunning.get()) {
          break;
        }

        AtomicBoolean audioReceived = new AtomicBoolean(false);
        processEvent(event, audioReceived);

        event.content().ifPresent(content -> content.parts().ifPresent(parts -> parts.forEach(part -> playAudioData(part, finalSpeakerLine))));
      }

      speakerLine = finalSpeakerLine; // finally 블록에서 정리를 위해 외부 변수에 할당
    } catch (LineUnavailableException e) {
      System.err.println("Error accessing speaker: " + e.getMessage());
      e.printStackTrace();
    } finally {
      if (speakerLine != null) {
        speakerLine.drain();
        speakerLine.stop();
        speakerLine.close();
      }
      conversationEnded.set(true);
    }
  }

  private void playAudioData(Part part, SourceDataLine speakerLine) {
    part.inlineData()
        .ifPresent(
            inlineBlob ->
                inlineBlob
                    .data()
                    .ifPresent(
                        audioBytes -> {
                          if (audioBytes.length > 0) {
                            System.out.printf(
                                "Playing audio (%s): %d bytes%n",
                                inlineBlob.mimeType(),
                                audioBytes.length);
                            speakerLine.write(audioBytes, 0, audioBytes.length);
                          }
                        }));
  }

  private void processEvent(Event event, java.util.concurrent.atomic.AtomicBoolean audioReceived) {
    event
        .content()
        .ifPresent(
            content ->
                content
                    .parts()
                    .ifPresent(parts -> parts.forEach(part -> logReceivedAudioData(part, audioReceived))));
  }

  private void logReceivedAudioData(Part part, AtomicBoolean audioReceived) {
    part.inlineData()
        .ifPresent(
            inlineBlob ->
                inlineBlob
                    .data()
                    .ifPresent(
                        audioBytes -> {
                          if (audioBytes.length > 0) {
                            System.out.printf(
                                "    Audio (%s): received %d bytes.%n",
                                inlineBlob.mimeType(),
                                audioBytes.length);
                            audioReceived.set(true);
                          } else {
                            System.out.printf(
                                "    Audio (%s): received empty audio data.%n",
                                inlineBlob.mimeType());
                          }
                        }));
  }

  public static void main(String[] args) throws Exception {
    LiveAudioRun liveAudioRun = new LiveAudioRun();
    liveAudioRun.runConversation();
    System.out.println("Exiting Live Audio Run.");
  }
}
라이브 오디오 실행 도구 실행하기
Live Audio Run 도구를 실행하려면 adk-agents 디렉토리에서 다음 명령어를 사용하세요.
그러면 다음 내용이 표시될 것입니다.
$ mvn compile exec:java
...
Initializing microphone input and speaker output...
Conversation started. Press Enter to stop...
Speaker initialized.
Microphone initialized. Start speaking...
이 메시지가 표시되면 도구가 음성 입력을 받을 준비가 된 것입니다. What's the electron?과 같은 질문을 에이전트에게 해보세요.
Caution
에이전트가 혼자 계속 말하고 멈추지 않는 현상이 관찰되면, 에코(메아리)를 억제하기 위해 이어폰을 사용해 보세요.
다음으로 음성 및 턴(turn) 감지를 설정하려면 구성을, 라이브 에이전트에 도구를 제공하려면 도구를 참고하세요.